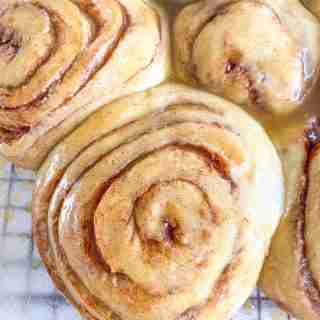
Sourdough Honey Buns (Inspired by Little Debbie)
When you take a bite of my sourdough honey buns, you get a mouth full of pillowy soft sourdough, sweet honey, and a hint of cinnamon. You won't regret whipping up this simple recipe. It really is easy! It's inspired by the Little Debbie baked treats you can buy at the store. I wanted to make my own version at home, from scratch, that not only tastes better but is much better for you!
Ingredients
Buns
- 1/2 cup fed sourdough starter (needs to be fed 4-12 hours before using)
- 8 Tbsp cold stick butter (salted)
- 3 cups all-purpose flour
- 1 cup water
- 1 tsp salt
- 2 Tbsp raw honey
- 1 tsp baking powder
- 1/2 tsp baking soda
- 1/3 cup milk (FOR BRUSHING TOPS, DON'T ADD TO DOUGH)
Filling
- 4 Tbsp butter (melted)
- 1 Tbsp ground Cinnamon
- 2 Tbsp raw honey
Glaze
- 3 Tbsp raw honey
- 2 Tbsp butter (melted)
- 1 Tbsp milk
- 1/2 tsp pure vanilla extract
Instructions
Before You Begin Prepare Your Starter
- Feed your starter 4-12 hours before starting this recipe. I recommend feeding it a 2:1 ratio of unbleached flour to filtered water to get the same results as I do when you make this recipe. Your starter needs to be active, bubbly, and a thicker consistency before you begin this recipe.
Make the Dough
- Add fed sourdough starter, butter grated with a cheese grater, flour, water, salt, and honey to a large bowl and mix to combine. (IMPORTANT: Do NOT add milk to dough, it is for brushing the tops before baking)
- To get the excess flour on the bottom, knead the dough in the bowl with your hands until it’s all incorporated and a sticky dough forms.
- Cover bowl with a lid or kitchen towel and let bulk ferment on the counter at room temperature for 10-12 hours (dough needs to double in size).
Shape the Buns
- After bulk ferment, uncover dough and sprinkle baking soda and baking powder over dough.
- Knead in the baking soda and baking powder by hand (or electric mixer) for 3 minutes.
- Make the filling by stirring melted butter, cinnamon, and honey in a bowl until combined. Set aside.
- Roll out dough on a lightly floured surface into a rectangle approximately 10" x 20".
- With a kitchen basting brush or butter knife, evenly spread the filling into a light layer over the entire rectangle of dough (it will be a very light layer of filling, that’s what you want)
- Starting at the shorter 10" side (shorter side) of the rectangle begin to roll the dough into a log. Pinch the seam together with your hands and slice the log into 10, 1.5 to 2-inch buns.
- Place buns on a baking sheet (lined with parchment or lightly greased with butter and flour) so that they’re in a cluster just barely touching one another.
- Use your hand to gently push down on each one to help flatten them a bit.
Prep the Buns & Bake
- Cover the baking sheet with a kitchen towel, plastic wrap, or a second sheet pan, and let the buns rise for 2 hours.
- After the rise, you can either continue the recipe or cover the baking sheet and pop the buns in the fridge until the morning to bake.
- When you’re ready to continue the recipe, preheat oven to 375 degrees Fahrenheit.
- Brush the tops of the buns with 1/3 cup milk or cream and bake for 20-25 minutes. (Test to ensure they’re baked fully by using a toothpick in the center bun. If it comes out clean, they’re done. If there’s dough residue, they need a few extra minutes).
- During this time of baking make the glaze by adding honey, melted butter, milk, and vanilla in a bowl, stirring until evenly combined.
- When the buns are done baking, immediately brush the glaze over them until it is all used up. Enjoy!
Notes
Please Read: This recipe doesn't include stretch and folds due to the kneading for 3 minutes after the dough bulk ferments. This is an uncommon way of doing honey buns but it works very well for this recipe.
IMPORTANT TIPS!
- Make sure your starter is active! BEFORE YOU GET STARTED: Feed your starter 4-12 hours before starting this recipe. I recommend feeding it a 2:1 ratio of unbleached flour to filtered water to get the same results as I do when you make this recipe. Example: Feed 1 cup flour + 1/2 cup water and let the starter sit on the counter at room temperature until it's bubbly and has grow in the jar. Your starter needs to be active, bubbly, and a thicker consistency to begin this recipe.
- Let the dough bulk ferment for 12 hours. It is important to let your dough bulk ferment for the full 12 hours. It should double in size and have air bubbles in it.
- Place the dough in a warm spot to rise. For both the bulk ferment and the second rise after shaping, your dough needs to be at room temperature in a non-drafty place.
- If your dough doesn't look like it's doing anything halfway through the rises, you need to place it in a slightly warmer area.
- This can be in a turned-off oven with the light on and oven door open, or you can slightly warm the oven to about 75-80 degrees Fahrenheit, then turn it off and place your dough inside with the door shut.
- Never leave the oven on, even on the keep warm setting, with fermenting dough inside. Your dough, for both rises, needs to double.
- If your dough doesn't double even in the warmer area, there is a problem with your starter. It is too weak to ferment the dough even in a warm environment.
- To fix this, you will want to leave your starter out on the counter for 2 days and feed it every 12 hours at a 2:1 ratio of unbleached flour to filtered water.
- For example, 1 cup unbleached flour + 1/2 cup filtered (or bottled) water.
- Make sure you're using unbleached flour and filtered or bottled water to do this. If you don't, it will affect your starter strength. Reverse osmosis water (or any water that uses salt in the filter) can make the starter weak.
- This will strengthen the cultures in your starter to give you fluffy baked bread and treats. After the 2 days, you can go back to feeding it like usual (once a week if stored in the fridge or once a day if stored on the counter). Be sure to use the 2:1 ratio feeding from here on out.