Easy Sourdough Pita Bread
Back in college, my husband and I used to eat pita bread filled with buffalo chicken nuggets. It was a delicacy in our apartment after we got married! We are no longer bellying up to the chicken nugget pita bread buffet, but we are making sourdough pita bread at home! You’re going to love how easy this recipe is!
This post may contain affiliate links of items I know and love. Read our disclosure policy for more information.
If you want to make this recipe but don’t have a sourdough starter, no worries! Grab my free guide so you can make your own starter at home.
If you’re new to sourdough baking and feel hesitant, or you have questions, I’ve got something for you! I broke down the basics of what you need to know about sourdough baking in my free sourdough baking guide for beginners. I highly recommend grabbing a copy!
What is Sourdough Pita Bread?
Sourdough pita bread is small leavened flatbread that uses sourdough starter instead of sourdough discard. It’s know for puffing up and forming a pocket while baking.
You can fill this bread with a filling like chicken shawarma or serve it as a side with dips or a main dish.

Why You’ll Love This Pita Recipe
- Easy Instructions: I developed this recipe so that each step of the instructions is simple and easy to follow.
- 2 Flours: This recipe uses two different types of flour: all-purpose and wheat. This creates a savory flavor you’re going to love!
- Delicious Flavor: The flavor is perfect to go alongside dips and main dishes.
- Stores Well: This pita bread stores really well up to 6 days at room temperature or 3 months in the freezer.
My Tips for Making Homemade Pita Bread
- Use an active starter. Before you make this recipe, ensure your sourdough starter is active and bubbly. This is important!
- Ensure the pizza stone or pan is hot. When you place the pita dough in the oven, your baking vessel needs to be already hot.
- Wait for the dough to bubble. Before you flip the dough in the oven, ensure it has bubbled up.
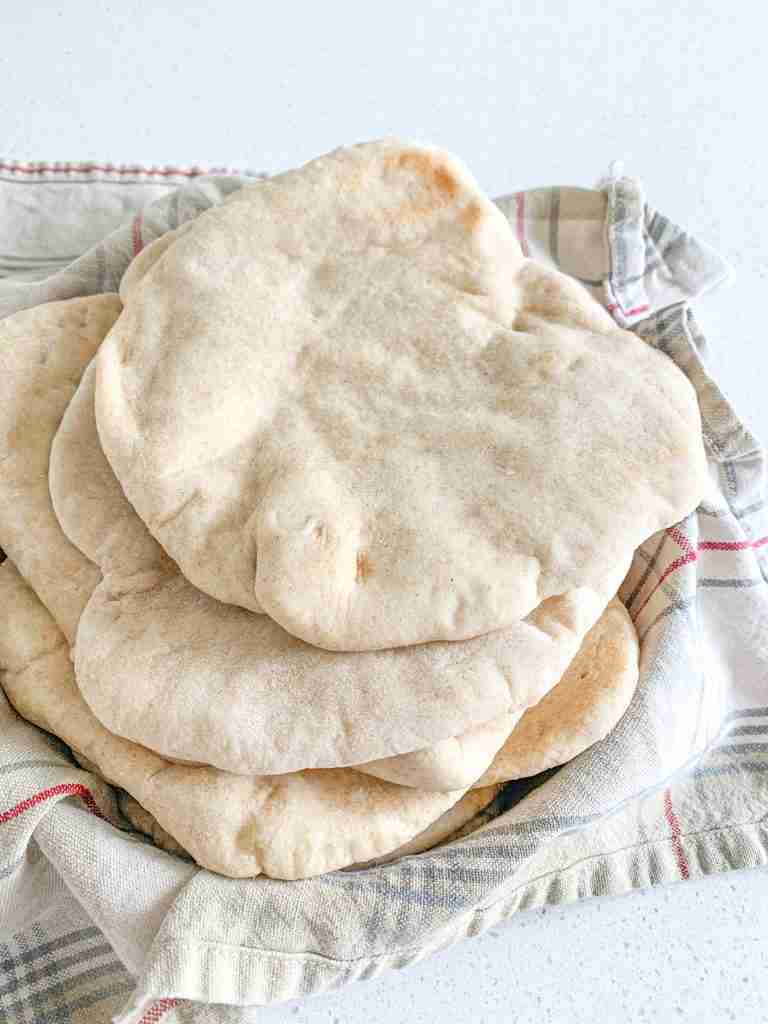
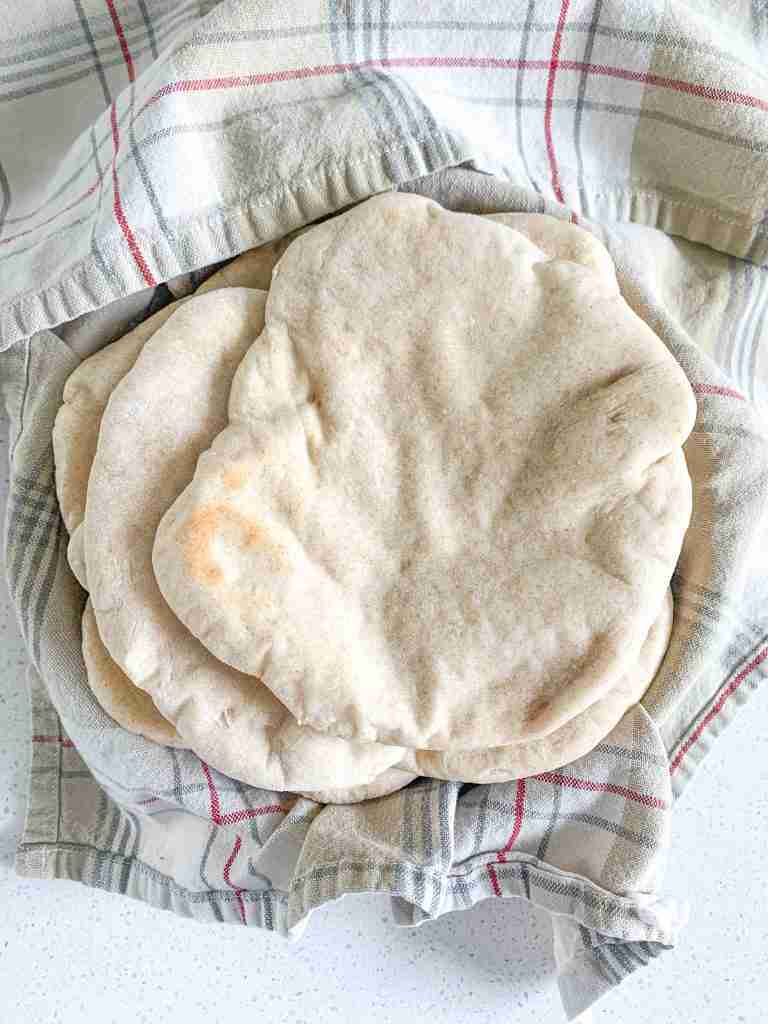
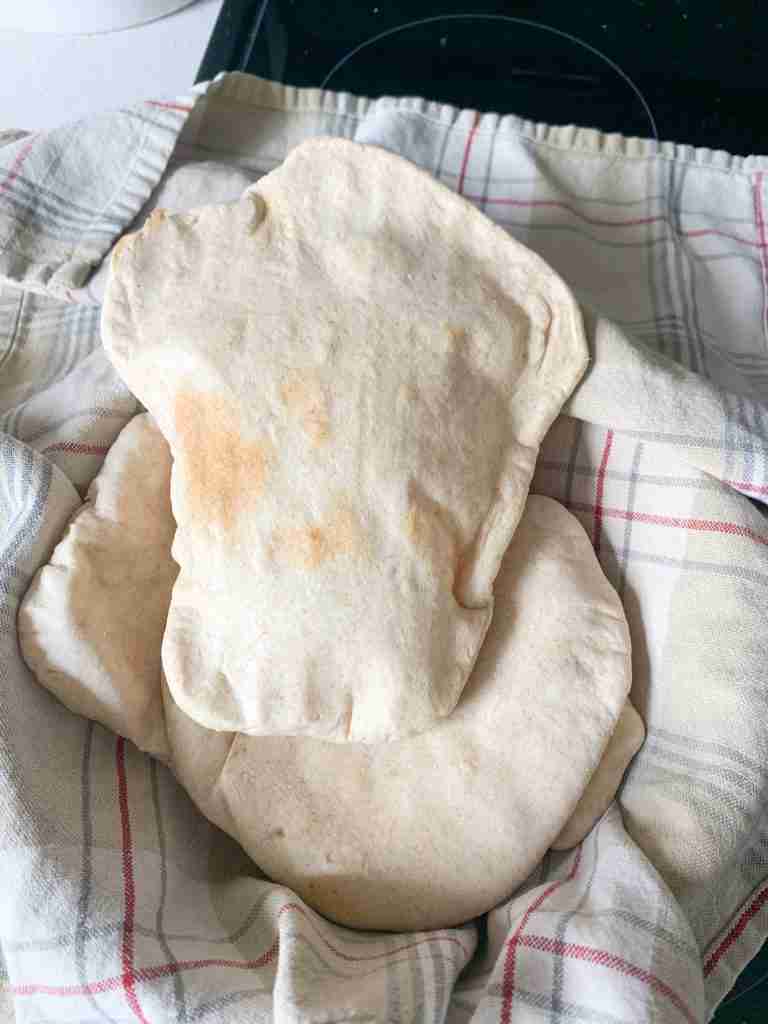
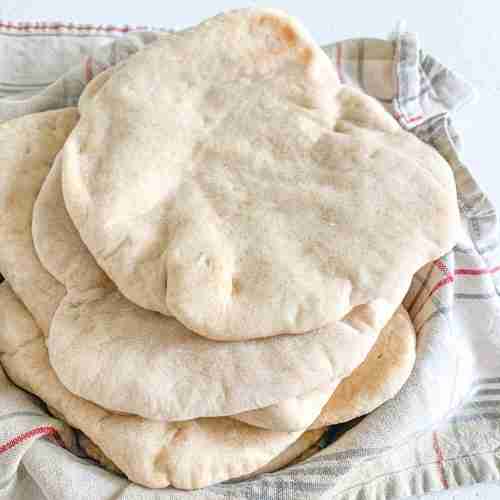
- Keep the pitas warm. Place cooked pitas in a warm kitchen towel while the others cook.
Frequently Asked Questions
I say yes, it is. The sourdough cultures ferment the rest of ingredients in the dough. This creates gut benefits you don’t get with yeast.
Pita bread is a type of flatbread that forms a pocket when it’s in the oven.
You can if you really want to, but I don’t recommend it. The sourdough starter takes place of yeast used in regular pita bread recipes.
I say yes. You get the gut benefits from the sourdough starter cultures fermenting the other ingredients in the dough.
No, you don’t. You can substitute the wheat flour for more all-purpose flour.
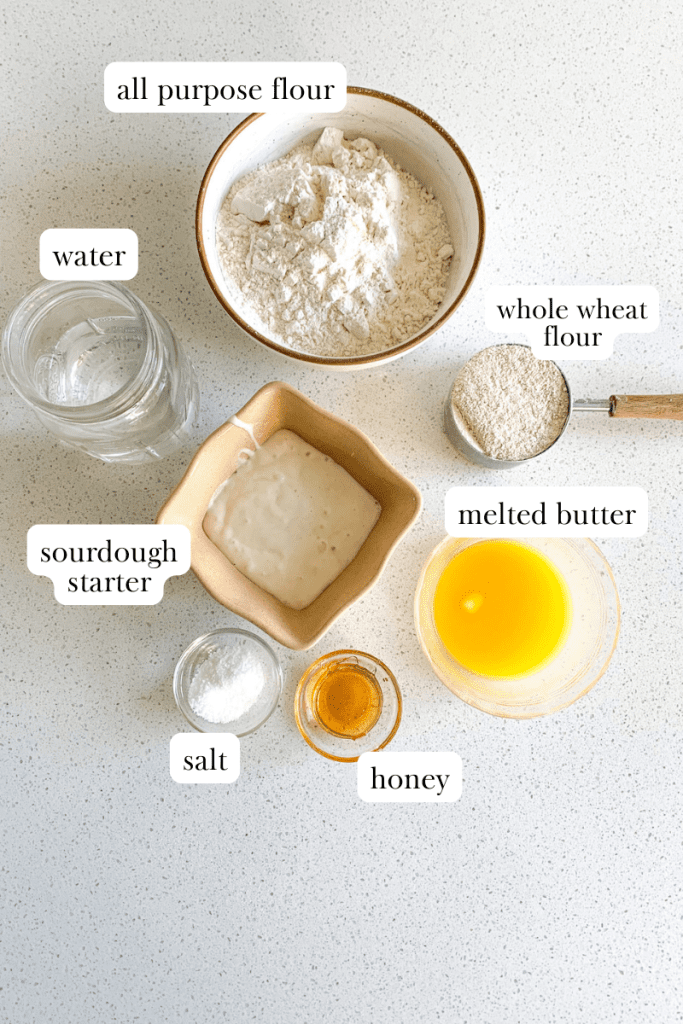
Ingredients You’ll Need
- water
- sea salt
- raw honey
- avocado oil (or melted butter)
- fed sourdough starter
- whole wheat flour
- all purpose flour (organic, unbleached is my favorite)
Kitchen Tools You May Need
This section contains Amazon affiliate links of items I know and love. Read our disclosure policy for more information.
- large mixing bowl (this one is my favorite!)
- pizza stone, cast iron pan, or sheet pan
- dough whisk (or spoon)
- bench scraper (or knife)
How to Make Sourdough Pita Bread
Feed Sourdough Starter
BEFORE YOU GET STARTED: Feed your entire sourdough starter jar 4-12 hours before starting this recipe. I recommend feeding your entire starter a 2:1 ratio of unbleached flour to filtered water to get the same results as I do when making this recipe.
(Example: Feed entire starter 1 cup flour + 1/2 cup water and let it sit on the counter at room temperature until it’s bubbly and has grow in the jar. Your starter needs to be active, bubbly, and a thicker consistency to use in this recipe.)
Make the Dough
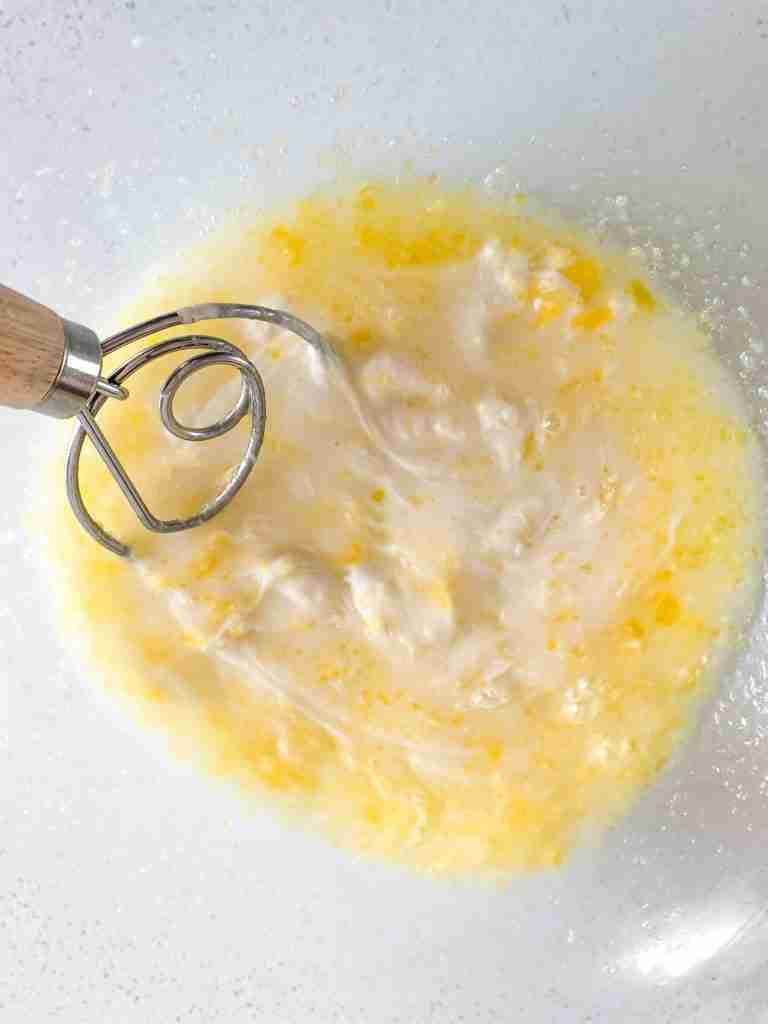
Add water, salt, honey, avocado oil, and fed sourdough starter into a large mixing bowl. Stir to combine.
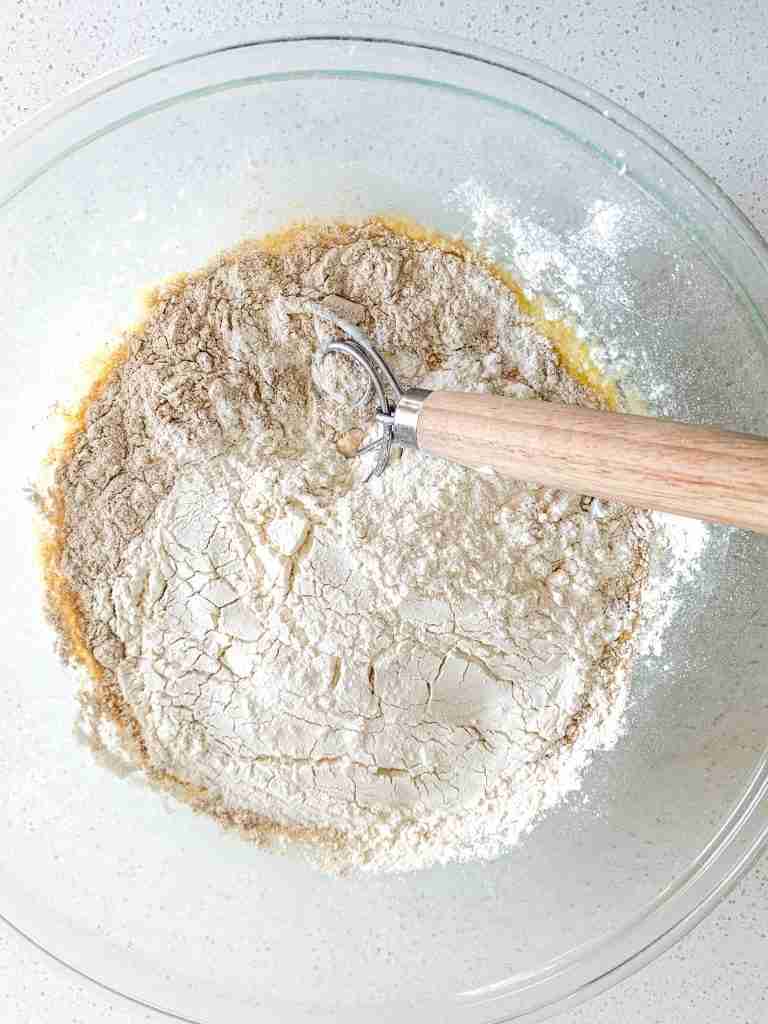
Add in both types of flour and stir to combine. Use your hands to incorporate any excess flour into the dough if needed.
(Depending on your starter hydration you may need to add a few Tablespoons of water if the dough is too dry or flour if the dough is too wet)
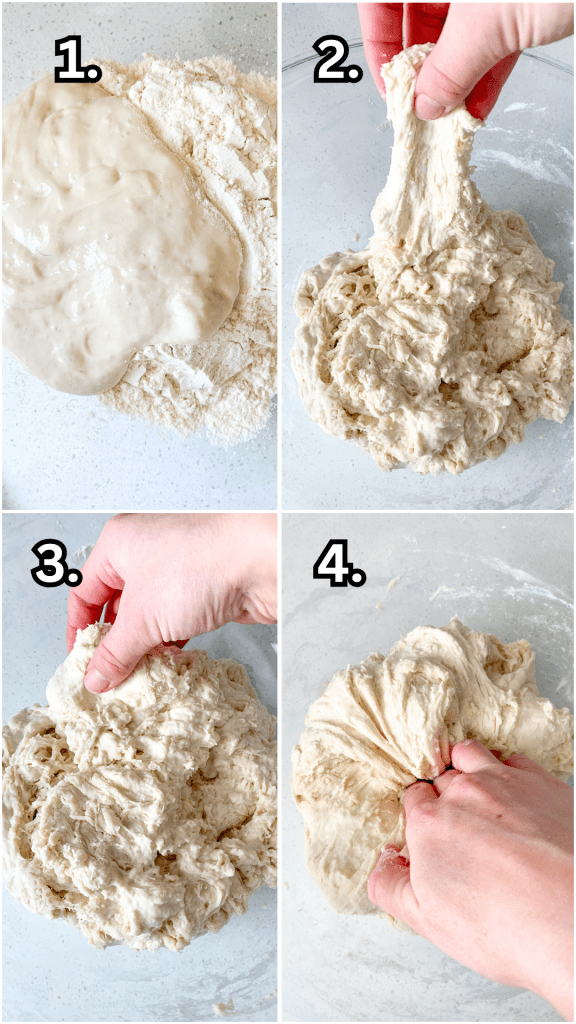
Stretch & Fold Dough
Cover dough with a lid loosely, a damp kitchen towel (that’s been wet then rung out), or plastic wrap. Let dough sit for 30 minutes on the counter at room temperature.
After 30 minutes, begin the first round of stretch and folds. To do this pull a section of the dough upward, folding it into the center, and pressing it down. Repeat this around the dough for 1-2 complete circles.
Cover the dough again and let it sit at room temperature for another 30 minutes. Then, repeat a second round of stretch and folds.
Bulk Ferment Dough
Bulk ferment dough on the counter top at room temperature for 12 hours. It should double or triple in size. (helpful information in notes below)
Shape Dough
Optional: Once dough has fermented, you can place it in the fridge for 1 hour to make it easier to work with or up to 48 hours to give you more time before shaping if needed.
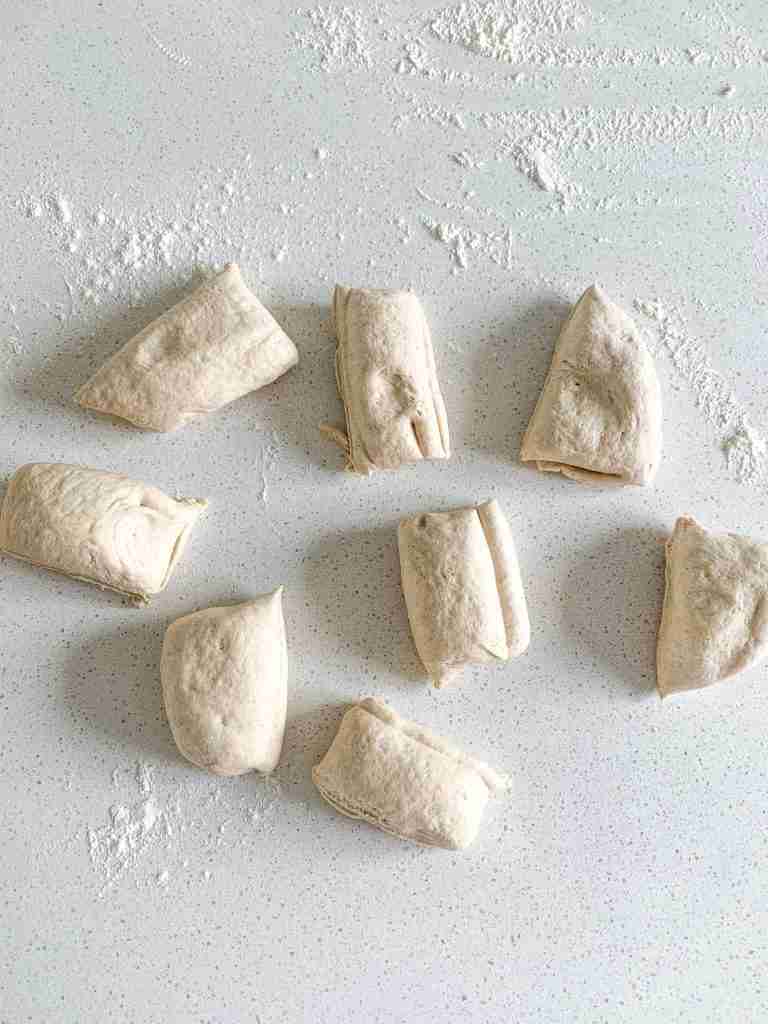
When you’re ready to continue the recipe, dust your counter with flour and divide the dough into 8 pieces.
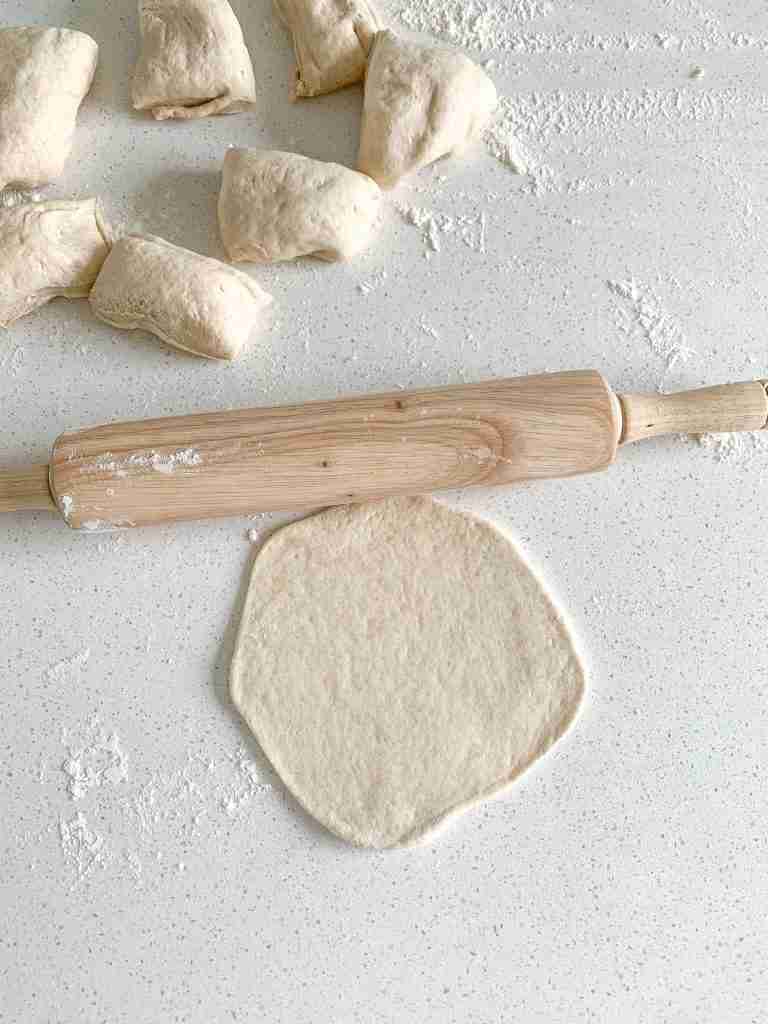
With a floured rolling pin, roll each piece out into a 1/4 inch thick, 6-7 inch wide circle. Dust with flour if it’s sticking.
Repeat with the rest of the dough.
Oven Cooking Method
Place a pizza stone in the oven and preheat to 450 degrees Fahrenheit.
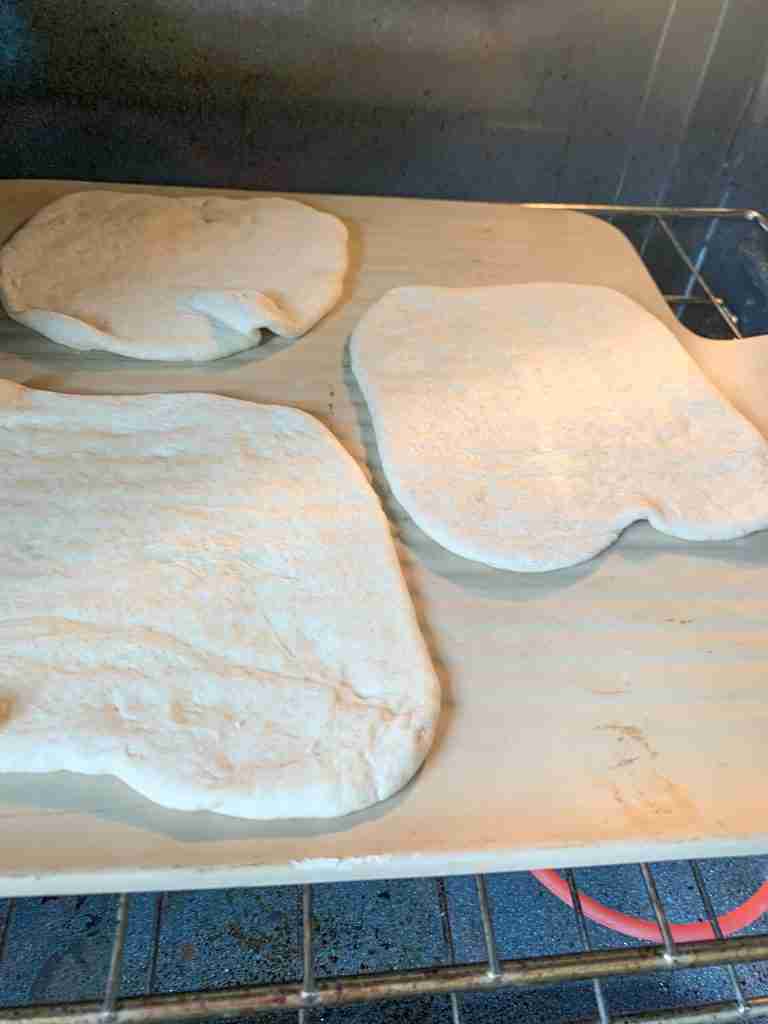
Once it’s preheated, place as many pitas on the stone as possible without them touching. Do this quickly so the oven doesn’t cool down too much.
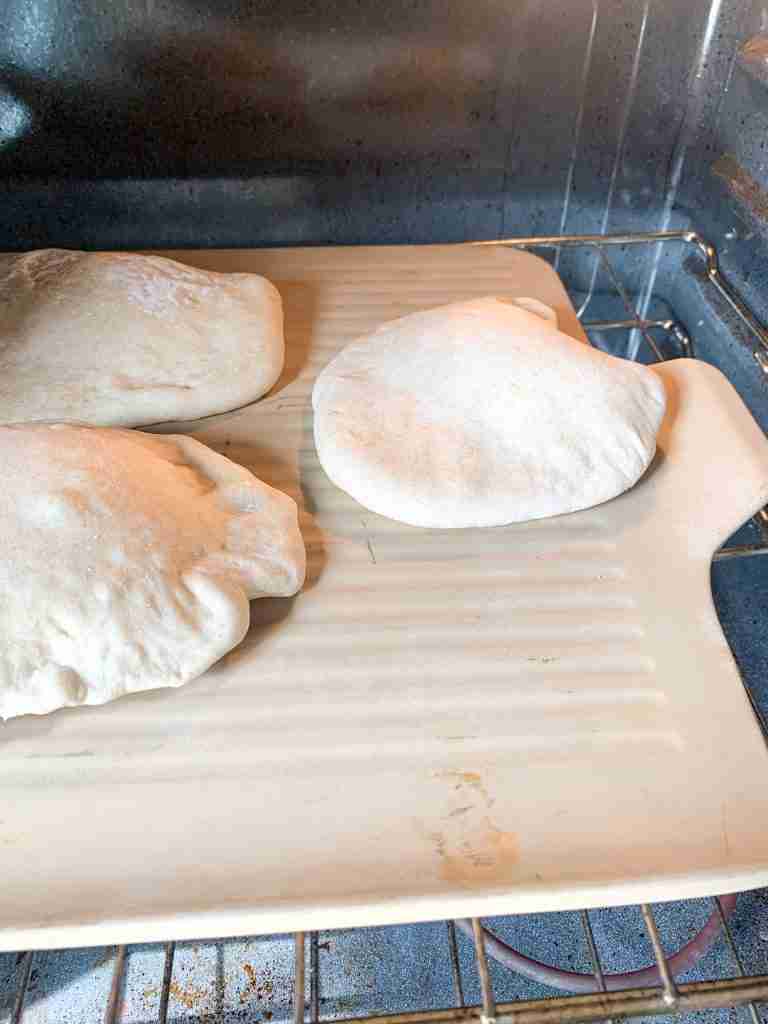
Bake until an air pocket blooms and the pita begins to brown. This will take about 3-5 minutes. Then flip and cook an additional 2-3 minutes.
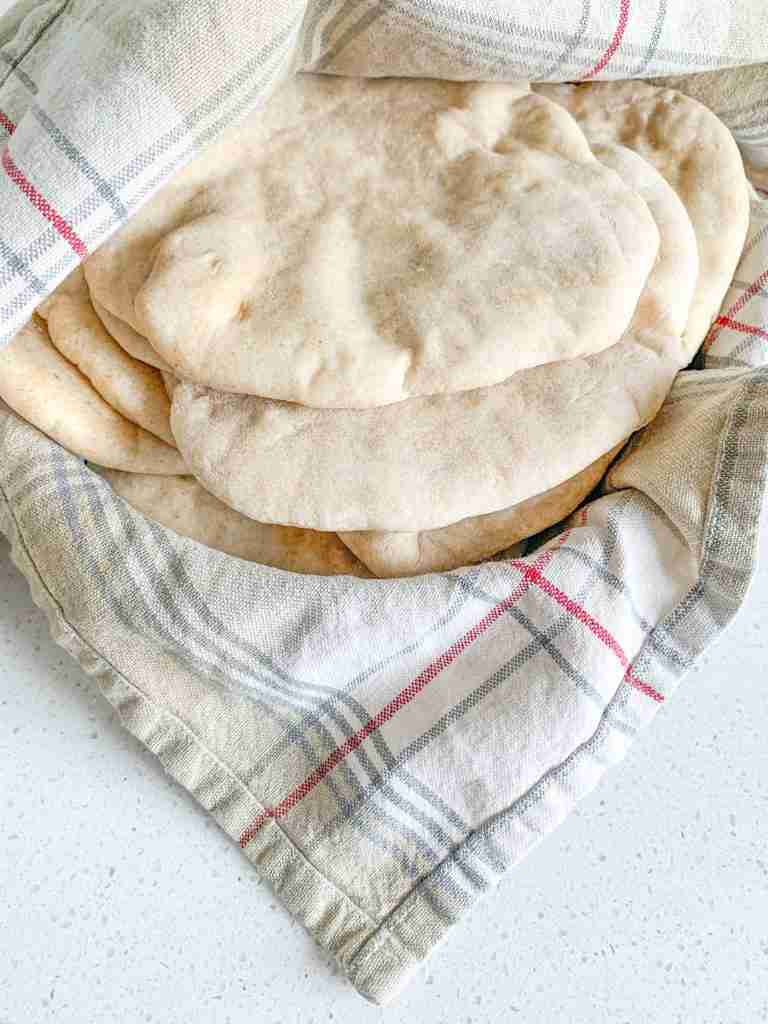
Cover cooked pitas with a warm kitchen towel while the rest are baking.
Repeat with the rest of the pita dough.
Stovetop Cooking Method
Place 1 tsp of avocado or olive oil in a skillet and heat on medium-high heat.
Place 1 pita dough in at a time and cook for 30 seconds or until you see bubbling of the dough.
Flip and cook for 1 minute. When it begins to poof up flip again and cook an additional 1 minute.
Storage Instructions
Store cooled down pita bread in an airtight container at room temperature for 5 to 6 days.
Freezing Instructions
Freezing pita bread is simple! Once the pita has cooled down, place parchment paper in between each bread, then place the stack in a freezer safe baggie or container. They’ll last up to 3 months in the freezer.
How to Serve Sourdough Pita Bread
You can serve pita bread in a few different ways! Here’s some ideas:
- as a pocket for a meat or veggie filling like chicken shawarma
- served with a dip
- served as a side with a main dish
More Easy Sourdough Bread Recipes
- Easy Sourdough Naan (brushed with garlic butter)
- Sourdough French Bread
- Artisan Sourdough Loaf for Beginners
- The Best Sourdough Sandwich Bread
If you made this recipe, give it a 5-star rating below and share a photo of your muffins on social media stories! Be sure to tag @plumbranchhome
Recipe
Easy Sourdough Pita Bread
Ingredients
- 1 cup water
- 1 1/2 tsp salt (I like sea salt)
- 2 tsp raw honey
- 2 Tbsp avocado oil (or melted butter)
- 1/2 cup fed sourdough starter (active & bubbly)
- 1/2 cup whole wheat flour
- 2 cups all purpose flour (I like organic, unbleached)
Instructions
Feed Sourdough Starter
- BEFORE YOU GET STARTED: Feed your entire sourdough starter jar 4-12 hours before starting this recipe. I recommend feeding your entire starter a 2:1 ratio of unbleached flour to filtered water to get the same results as I do when making this recipe. (Example: Feed entire starter 1 cup flour + 1/2 cup water and let it sit on the counter at room temperature until it's bubbly and has grow in the jar. Your starter needs to be active, bubbly, and a thicker consistency to use in this recipe.)
Make the Dough
- Add water, salt, honey, avocado oil, and fed sourdough starter into a large mixing bowl. Stir to combine.
- Add in both types of flour and stir to combine. Use your hands to incorporate any excess flour into the dough if needed. (Depending on your starter hydration you may need to add a few Tablespoons of water if the dough is too dry or flour if the dough is too wet)
Stretch & Fold Dough
- Cover dough with a lid loosely, a damp kitchen towel (that’s been wet then rung out), or plastic wrap. Let dough sit for 30 minutes on the counter at room temperature.
- After 30 minutes, begin the first round of stretch and folds. To do this pull a section of the dough upward, folding it into the center, and pressing it down. Repeat this around the dough for 1-2 complete circles.
- Cover the dough again and let it sit at room temperature for another 30 minutes. Then, repeat a second round of stretch and folds.
Bulk Ferment Dough
- Bulk ferment dough on the counter top at room temperature for 12 hours. It should double or triple in size. (helpful information in notes below)
Shape Dough
- Optional: Once dough has fermented, you can place it in the fridge for 1 hour to make it easier to work with or up to 48 hours to give you more time before shaping if needed.
- When you’re ready to continue the recipe, dust your counter with flour and divide the dough into 8 pieces.
- With a floured rolling pin, roll each piece out into a 1/4 inch thick, 6-7 inch wide circle. Dust with flour if it’s sticking.
- Repeat with the rest of the dough.
Oven Cooking Method
- Place a pizza stone in the oven and preheat to 450 degrees Fahrenheit.
- Once it’s preheated, place as many pitas on the stone as possible without them touching. Do this quickly so the oven doesn’t cool down too much.
- Bake until an air pocket blooms and the pita begins to brown. This will take about 3-5 minutes. Then flip and cook an additional 2-3 minutes.
- Cover cooked pitas with a warm kitchen towel while the rest are baking.
- Repeat with the rest of the pita dough.
Stovetop Cooking Method
- Place 1 tsp of avocado or olive oil in a skillet and heat on medium-high heat.
- Place 1 pita dough in at a time and cook for 30 seconds or until you see bubbling of the dough.
- Flip and cook for 1 minute. When it begins to poof up flip again and cook an additional 1 minute.
Notes
- If your dough doesn’t look like it’s doing anything halfway through the rises, you need to place it in a slightly warmer area.
- This can be in a turned-off oven with the light on and oven door open, or you can slightly warm the oven to about 75-80 degrees Fahrenheit, then turn it off and place your dough inside with the door shut.
- Never leave the oven on, even on the keep warm setting, with fermenting dough inside. Your dough, for both rises, needs to double.
- If your dough doesn’t double even in the warmer area, there is a problem with your starter. It is too weak to ferment the dough even in a warm environment.
- To fix this, you will want to leave your starter out on the counter for 2 days and feed it every 12 hours at a 2:1 ratio of unbleached flour to filtered water.
- For example, 1 cup unbleached flour + 1/2 cup filtered (or bottled) water.
- Make sure you’re using unbleached flour and filtered or bottled water to do this. If you don’t, it will affect your starter strength. Reverse osmosis water (or any water that uses salt in the filter) can make the starter weak.
- This will strengthen the cultures in your starter to give you fluffy baked bread and treats. After the 2 days, you can go back to feeding it like usual (once a week if stored in the fridge or once a day if stored on the counter). Be sure to use the 2:1 ratio feeding from here on out.