Artisan Sourdough Boule
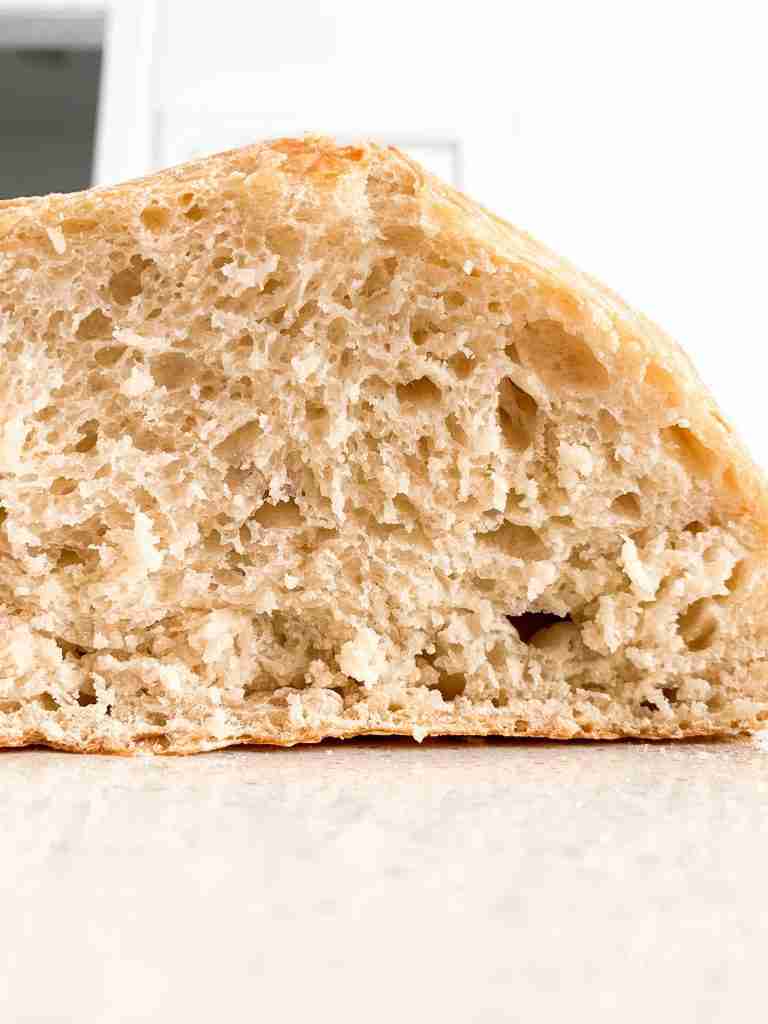
This artisan sourdough boule is a bread recipe that gives you bakery-style bread at home. With a developed sourdough taste, a soft crumb, and the perfect crust, you’ll be surprised it was made at home! Unlike most hydrated sourdough bread recipes, this one is broken down into simple steps, making it perfect for beginners. It contains only 15 minutes of hands-on time!

This post may contain affiliate links of items I know and love. Read our disclosure policy for more information.
If you want to make this recipe but don’t have a sourdough starter, no worries! Grab my free guide so you can make your own starter at home.
If you’re new to sourdough baking and feel hesitant, or you have questions, I’ve got something for you! I broke down the basics of what you need to know about sourdough baking in my free sourdough baking guide for beginners. I highly recommend grabbing a copy!
When baking artisan sourdough bread loaves, it’s important to remember some loaves won’t turn out perfect. Sometimes your starter will be less hydrated, or the dough doesn’t ferment enough, or even the oven temperatures drop without you knowing.
These things aren’t necessarily problems but rather circumstances that happen when baking with sourdough. It’s both an art form and a science so don’t beat yourself up when things aren’t perfect. I still have occasional weird loaves but, you know what they still taste amazing!
Artisan Sourdough Bread Recipe Inspiration
I started my sourdough starter at the beginning of January 2023. Since then I’ve developed many sourdough bread loaves for the blog such as a no-knead loaf, a cinnamon raisin loaf, and a seeded whole wheat loaf. They’re all fantastic but I wanted a simple artisan boule to add to the list.
The inspiration behind this bread was to create a simple recipe that tasted like it was made in a bakery. After a little research, trial and error, and a whole lot of testing, this loaf has become our go-to! I’ve continually baked this recipe over and over again, it’s that dang good.
What is Artisan Sourdough Bread
Artisan sourdough bread is simply homemade bread made with a sourdough starter instead of yeast. It’s usually shaped into a boule, round shape, and baked in a Dutch oven or bread cloche. Baking in either of these vessels gives the loaves that artisan flair: a soft crumb and a developed crust.
Benefits of Sourdough Bread
- High-quality ingredients to protect your body from harmful dough conditioners and additives
- Natural fermentation of the sourdough cultures adds gut health benefits to each loaf
- Doesn’t spike blood glucose, or sugar levels, like regular bread because of the fermentation
- Contains healthy carbohydrates to feed your brain unlike regular bread

Why You’ll Love This Recipe
- Simple steps make this recipe easy to understand
- Only 4 ingredients are needed
- The amount of hands-on time is a total of 15 minutes
- Tastes wonderful every time you make it
Artisan Sourdough Bread Ingredients
- 1/2 cup fed sourdough starter (feed starter 4-12 hours before using)
- 1 1/4 cups room temperature water
- 2 tsp salt
- 3 1/2 cups unbleached all-purpose flour
How to Feed a Sourdough Starter
Feed your sourdough starter 4-12 hours before using it. To feed it use a 2 parts flour to 1 part water ratio. For example if you feed your starter 1/2 cup flour, you’ll want to add 1/4 cup water. Learn more about starter feeding with this post: The Best Sourdough Starter Feeding Ratio & Guide
Things To Avoid With The Ingredients
Never use bleached flour or city water that’s not filtered. Both of these items can kill your sourdough starter which will cause bread not to rise. Also never use hot water or cold water, it needs to be room temp or slightly warmed to protect the sourdough cultures.
Helpful Sourdough Baking Tools for This Recipe
- Large Glass Bowl
- Kitchen Towel
- Bread Whisk
- Bread Razor
- Proofing Bowl
- Dutch Oven or Bread Cloche (I have this bread cloche and love it!)
For baking tool substitutes and an explanation of how to use each of these listed above, checkout the blog post a Complete List of Sourdough Baking Supplies You Need


How to Make Artisan Sourdough Bread Recipe
Prepare Your Starter
Feed your starter 4-12 hours before starting this recipe. I recommend feeding it a 2:1 ratio of unbleached flour to filtered water to get the same results as I do when you make this recipe. Your starter needs to be active, bubbly, and a thicker consistency to begin this recipe.
Make the Dough
In a large mixing bowl, add in sourdough starter, water, and salt, then stir until combined.
Add flour and stir until a shaggy dough forms. Use your hands to bring the dough into a ball. If this isn’t working add 1-2 Tablespoons of extra water to help but don’t do this if not necessary.
Stretch and Fold
Cover dough with a lid loosely, a damp kitchen towel (that’s been wet then rung out), or plastic wrap. Let dough sit for 30 minutes on the counter at room temperature.
After 30 minutes, begin the first round of stretch and folds. To do this pull a section of the dough upward, folding it into the center, and pressing it down. Repeat this around the dough for 1-2 complete circles.
Cover the dough again and let it sit at room temperature for another 30 minutes. Then, repeat a second round of stretch and folds.
Bulk Ferment
Cover the dough and let it sit at room temperature on the counter or in a turned-off oven/microwave for 12 hours until it doubles in size. See notes for helpful information.
Shape the Boule
Once bulk fermentation is complete your dough should have doubled in size. Punch it down to deflate then place the dough on the counter. No flour needed.
Pick the dough up in the center letting the dough ends fold underneath. Then use your hands to sweep the dough in circular motions while tucking underneath to create tension.
Let it rest for 5 minutes. Repeat the circular motions again to create more tension, then place it upside down in a lightly floured rattan basket or bowl.
Cool & Bake Bread
Cover the basket or bowl of shaped dough and place in the fridge for 3–24 hours.
Preheat the oven to 425°F with a Dutch oven or bread cloche inside. Place the dough seam (bottom) side down into the vessel. Make some cuts on top with a knife to score it.
Bake in a dutch oven or bread cloche covered for 35 minutes, then uncover and bake for another 15 minutes to develop the crust.
Let the bread cool on a wire rack before slicing then enjoy!
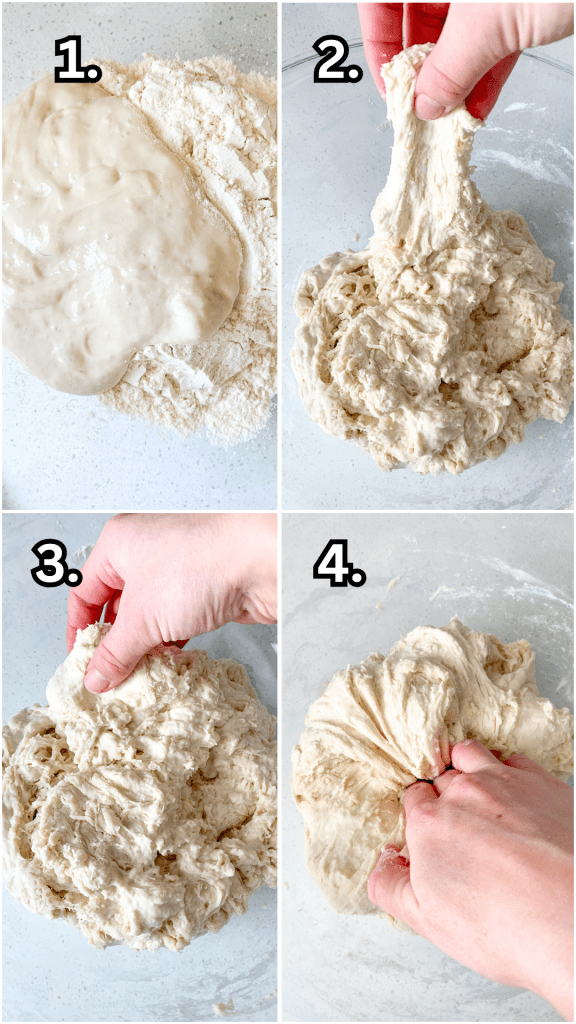
Stretch and Fold Dough Infographic
This infographic above is showing you the steps of a sourdough stretch and fold technique through imagery. I’ve created this to give you a visual when making this recipe. It’s super simple to do!
Tips for the Best Artisan Sourdough Bread Loaf
- Don’t skip a step of this recipe or rush any part of the process
- Check out the sourdough sample baking timeline below to help you plan your bake ahead of time
- Always do the poke test before baking
- Don’t knead this bread dough
- Feed your sourdough starter 4-12 hours before using
- Never let your dough bulk ferment or sit on the counter for more than 12 hours. You don’t want it to over ferment.

Example Baking Timeline for Busy Weekends
Saturday Night:
7:00 PM: Mix ingredients in a bowl. Rest dough for 30 mins.
7:30 PM: Stretch and fold dough. Rest for another 30 mins.
8:00 PM: Stretch and fold again. Let dough sit overnight on the counter.
Sunday Morning:
7:00 AM: Shape dough and put in the fridge.
Sunday Evening:
7:00 PM: Preheat oven with Dutch oven inside.
7:30 PM: Bake covered for 35 mins.
8:05 PM: Bake uncovered for 15 mins.
8:20 PM: Let bread cool before slicing and enjoying!
Artisan Sourdough Bread Storage
Store bread for 2-3 days at room temperature in a bread box with ventilation or 4-5 days in an airtight container in a cool, dry place. For longer-lasting bread, store it in an air-tight container in the fridge for up to 7 days. If you want to freeze baked bread, package it in an air-tight bag or container and freeze it for up to 3 months.
Recipe FAQ
In an air-tight container or a bread box it will keep for about 3 days at room temperature or up to 7 days in the fridge.
Just feed it 4-12 hours before using and it will be good to go.
I haven’t tried different flours with this recipe but I’m sure you can. Just know different flours call for different ingredient ratios. If you’re looking to use whole wheat flour, try this recipe: Simple Seeded Sourdough Whole Wheat Bread
Artisan bread is bread that contains sourdough starter instead of commercial yeast.
You’ll need a Dutch oven or bread cloche do achieve the sourdough crust.
Next time you bake a loaf you can either move your oven rack up one notch or sit your baking vessel on a cookie sheet while baking to protect the bottom from burning.
Yes! Sourdough bread is one of the healthiest options due to natural fermentation.
More Sourdough Bread Recipes To Try
- Sourdough Cinnamon Raisin Bread From Scratch
- Sourdough Multi Seed Bread Recipe from Scratch
- Simplified Same Day Sourdough Bread Recipe
- Easiest No Knead Sourdough Bread (Great for Beginners)
Artisan Sourdough Boule Recipe

Artisan Sourdough Boule
Ingredients
- 1/2 cup fed sourdough starter (feed starter 4-12 hours before using)
- 1 1/4 cups water
- 2 tsp salt
- 3 1/2 cups unbleached all-purpose flour
Instructions
- BEFORE YOU GET STARTED: Feed your starter 4-12 hours before starting this recipe. I recommend feeding it a 2:1 ratio of unbleached flour to filtered water to get the same results as I do when you make this recipe. Your starter needs to be active, bubbly, and a thicker consistency to begin this recipe.
- In a large mixing bowl, add in sourdough starter, water, and salt, then stir until combined.
- Add flour and stir until a shaggy dough forms. Use your hands to bring the dough into a ball. If this isn’t working add 1-2 Tablespoons of extra water to help but don’t do this if not necessary.
- Cover dough with a lid loosely, a damp kitchen towel (that’s been wet then rung out), or plastic wrap. Let dough sit for 30 minutes on the counter at room temperature.
- After 30 minutes, begin the first round of stretch and folds. To do this pull a section of the dough upward, folding it into the center, and pressing it down. Repeat this around the dough for 1-2 complete circles.
- Cover the dough again and let it sit at room temperature for another 30 minutes. Then, repeat a second round of stretch and folds.
- Cover the dough and let it sit at room temperature on the counter or in a turned-off oven/microwave for 12 hours until it doubles in size. See notes for helpful information.
- Once bulk fermentation is complete your dough should have doubled in size. Punch it down to deflate then place the dough on the counter. No flour needed.
- Pick the dough up in the center letting the dough ends fold underneath. Then use your hands to sweep the dough in circular motions while tucking underneath to create tension.
- Let it rest for 5 minutes. Repeat the circular motions again to create more tension, then place it upside down in a lightly floured rattan basket or bowl.
- Cover the basket or bowl of shaped dough and place in the fridge for 3–24 hours.
- Preheat the oven to 425°F with a Dutch oven or bread cloche inside. Place the dough seam (bottom) side down into the vessel. Make some cuts on top with a knife to score it.
- Bake in a dutch oven or bread cloche covered for 35 minutes, then uncover and bake for another 15 minutes to develop the crust.
- Let the bread cool on a wire rack before slicing then enjoy!
Notes
- For the bulk ferment your dough needs to be at room temperature in a non-drafty place.
- If your dough doesn’t look like it’s doing anything halfway through the rise, you need to place it in a slightly warmer area.
- This can be in a turned-off oven with the light on and oven door open, or you can slightly warm the oven to about 75-80 degrees Fahrenheit, then turn it off and place your dough inside with the door shut.
- Never leave the oven on, even on the keep warm setting, with fermenting dough inside. Your dough needs to double.
Great recipe, crunchy on the outside but soft inside!! Easy recipe and worth the wait for the cold ferment over night for homemade bread.
I don’t have a Dutch oven or bread cloche.
I covered the bread up with tinfoil towards the end of baking so it wouldn’t get to brown.
PBH thanks for the tips, notes and timeline of the recipe!! I love those about your recipes, they sure help a lot!!
I am so happy to hear you love this bread recipe and enjoy those sections of my blog posts! Anything to help cut confusion and overwhelm with sourdough! Thank you for sharing that tip for anyone who doesn’t have a bread cloche or Dutch oven!!