Cheesy Sourdough Garlic Pull Apart Bread
My cheesy sourdough garlic pull apart bread is simple to make but feels so special! Each piece is full of garlic butter and gooey cheese. What’s not to love?! My husband and I love enjoying this bread alongside our favorite bowl of soup! I hope it finds a special place on your table like it has on ours! This recipe includes a video tutorial so you can make it alongside me, step-by-step!
This post may contain affiliate links of items I know and love. Read our disclosure policy for more information. I NEVER use AI (artificial intelligence) to create content for Plum Branch Home. Recipes, blog posts, photos, videos, podcasts, social media content: everything is made from scratch by me, Molly LaFontaine. After developing my recipes, they’re tested 2x by my husband, Tyler, and I before publishing. What you see from Plum Branch Home is real. It’s made for a reason, tested, and loved!
If you want to make this recipe but don’t have a sourdough starter, no worries! Grab my free guide so you can make your own starter at home.
If you’re new to sourdough baking and feel hesitant, or you have questions, I’ve got something for you! I broke down the basics of what you need to know about sourdough baking in my free sourdough baking guide for beginners. I highly recommend grabbing a copy!

Inspiration Behind My Sourdough Garlic Pull Apart Bread Recipe
I got inspired to make this recipe right before Lent started up. I wanted to develop something that would go well with my fettuccine alfredo for meatless Friday nights during the Lent season.
My husband and I already loved our regular garlic bread and garlic knots, but we wanted something new to add into the rotation. That’s when this pull-apart recipe was born!
I hope you love it as much as we do! It’s not just for meatless Fridays during Lent. It’s the perfect side for soups, weeknight pasta dishes, holidays, and snacking while watching football.
Why We Love This Recipe and So Will You!
- Made with Wholesome Ingredients: Each ingredient is wholesome and minimally processed.
- Benefits from Long Fermentation: This recipe may take a little longer than others, but this allows the sourdough cultures to fully ferment the other ingredients, giving you more gut benefits.
- Simple Instructions: Every step is simple enough for even beginner bakers to follow along.
- Fun to Make: I’ve developed this recipe a little differently. It’s so fun to assemble!
- The Perfect Side: This cheesy sourdough garlic pull apart bread is such a good side for salads, pizza night, pasta meals, soups, and more!
My Tips for Baking Sourdough Pull Apart Garlic Bread
- Don’t let the amount of steps overwhelm you! Each one is simple, and the hands-on time is only 20 minutes!
- Feed your starter before you make this recipe. Feed your starter 4-12 hours before starting this recipe. I recommend feeding it in a 2:1 ratio of unbleached flour to filtered water to get the same results as I do when you make this recipe. Example: Feed 1 cup flour + 1/2 cup water and let the starter sit on the counter at room temperature until it’s bubbly and has grown in the jar. Your starter needs to be active, bubbly, and of a thicker consistency to begin this recipe.
- Knead the full time. Make sure you knead the dough the entire time!
- Let the dough bulk ferment for 12 hours. It is important to let your dough bulk ferment for the full 12 hours. It should double in size and have air bubbles in it.
- Place the dough in a warm spot to rise. For the bulk ferment, your dough needs to be at room temperature in a non-drafty place.
- Be Generous with the filling! You don’t want to skimp on the garlic butter filling or cheese.
How to Feed a Sourdough Starter for This Recipe
Feed your entire sourdough starter jar 4-12 hours before you want to make this recipe. To feed it, use a 2 parts flour to 1 part water. For example, if you feed your starter 1/2 cup flour, you’ll want to add 1/4 cup water. Learn more about starter feeding with this post: The Best Sourdough Starter Feeding Ratio & Guide.
Ingredients You’ll Need (with notes and substitutions)
Note: Please see the recipe card at the bottom of this blog post for measurements

Sourdough Garlic Bread Dough Ingredients
- fed sourdough starter: feed your starter 4-12 hours before using it
- water: I always use filtered water
- salt: I use sea salt
- all-purpose flour: you can use any but I always like unbleached, organic
- garlic powder: make sure it’s salt free

Cheesy Garlic Bread Filling
- shredded mozzarella: make sure it’s low moisture
- shredded mild cheddar: mild is the best but medium is good too
- garlic powder: make sure it’s salt-free
- salt: I always use sea salt
- butter: I like to use salted butter
- dried parsley: this is optional but adds color
Variations
- Use a Different Cheese: You can use any type of cheese you desire. If you prefer gouda or sharp cheddar, substitute them in!
- Add Fresh Garlic: If you want to use fresh garlic in the dough, go right ahead! Just make a note that fresh garlic can turn bluish – green when exposed to air. This doesn’t mean it’s gone bad. It just means it’s oxidized.
- Add Fresh Herbs: You can add any herbs of your choice to this bread.
Helpful Kitchen Tools for this Recipe
This section contains Amazon affiliate links to items I use and love for this recipe.
- Large Glass Bowl
- Bread Whisk
- 9×5″ loaf pan— this is the perfect loaf pan size; stainless steel is best.
- rolling pin
How to Make Sourdough Garlic Pull Apart Bread
Note: Please see the recipe card at the bottom of this blog post for the full written recipe.
Feed Your Starter
BEFORE YOU GET STARTED: Feed your starter 4-12 hours before starting this recipe. I recommend feeding your entire starter jar a 2:1 ratio of unbleached flour to filtered water to get the same results as I do when making this recipe.
(Example: Feed entire starter 1 cup flour + 1/2 cup water and let it sit on the counter at room temperature until it’s bubbly and has grow in the jar. Your starter needs to be active, bubbly, and a thicker consistency to use in this recipe.)
Make the Dough
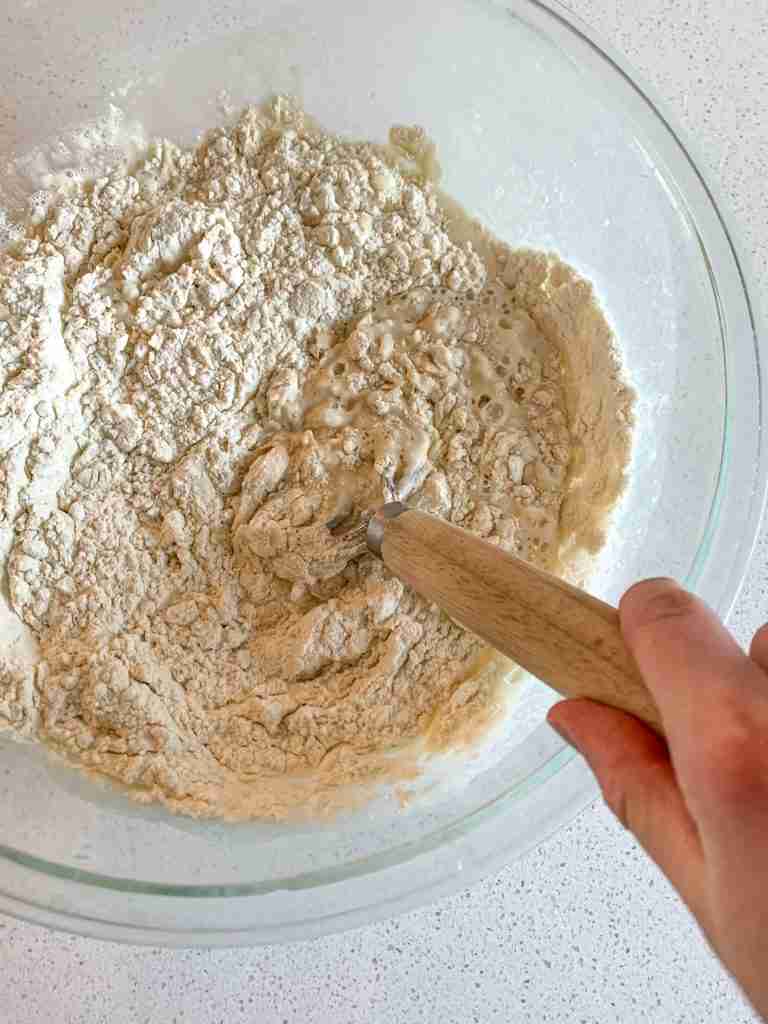
In a large mixing bowl, add in sourdough starter, water, salt, and garlic powder. Stir until combined.
Add flour and stir until a shaggy dough forms. Use your hands to bring the dough into a ball.(If dough is too wet, your starter is more hydrated than mine. Just add a few tablespoons of extra flour. If dough is too dry, your starter is less hydrated than mine. Just add a few tablespoons of extra water.)
Turn dough out on the counter and knead by hand for 2 minutes or use an electric mixer with a dough hook. Place dough back into mixing bowl and cover with a lid loosely, plastic wrap, or a damp kitchen towel (that’s been wet and rung out)
Bulk Ferment the Dough
Let dough sit on the counter top at room temperature for 12 hours. Please see notes below!
Shape the Pull Apart Loaf
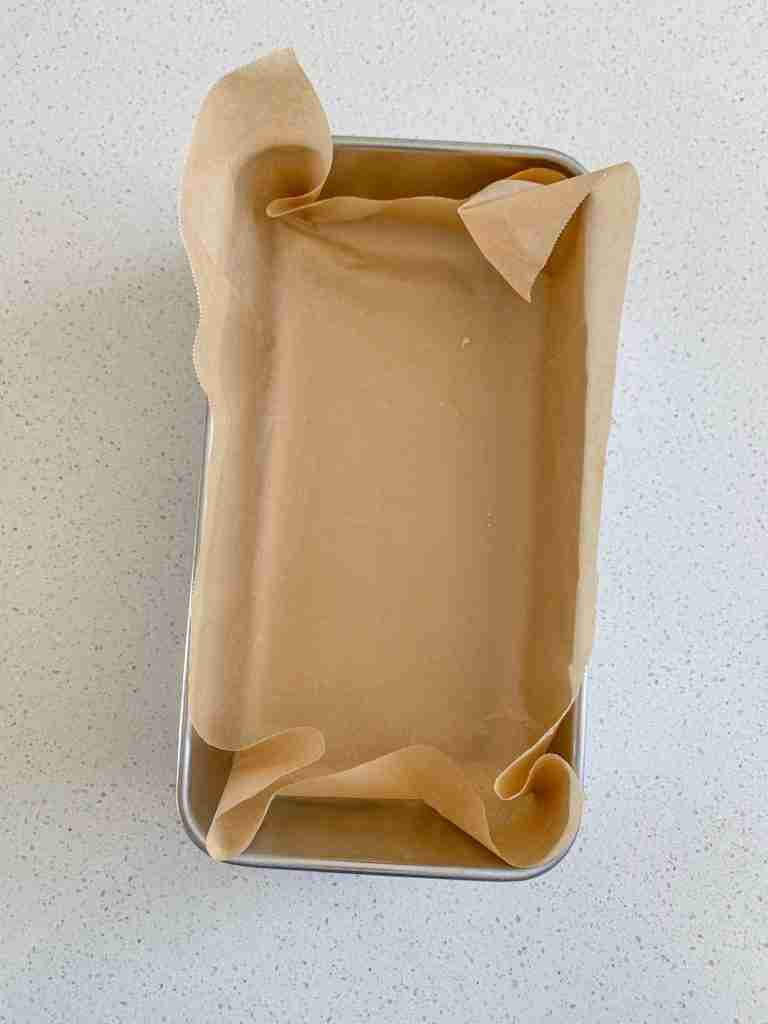
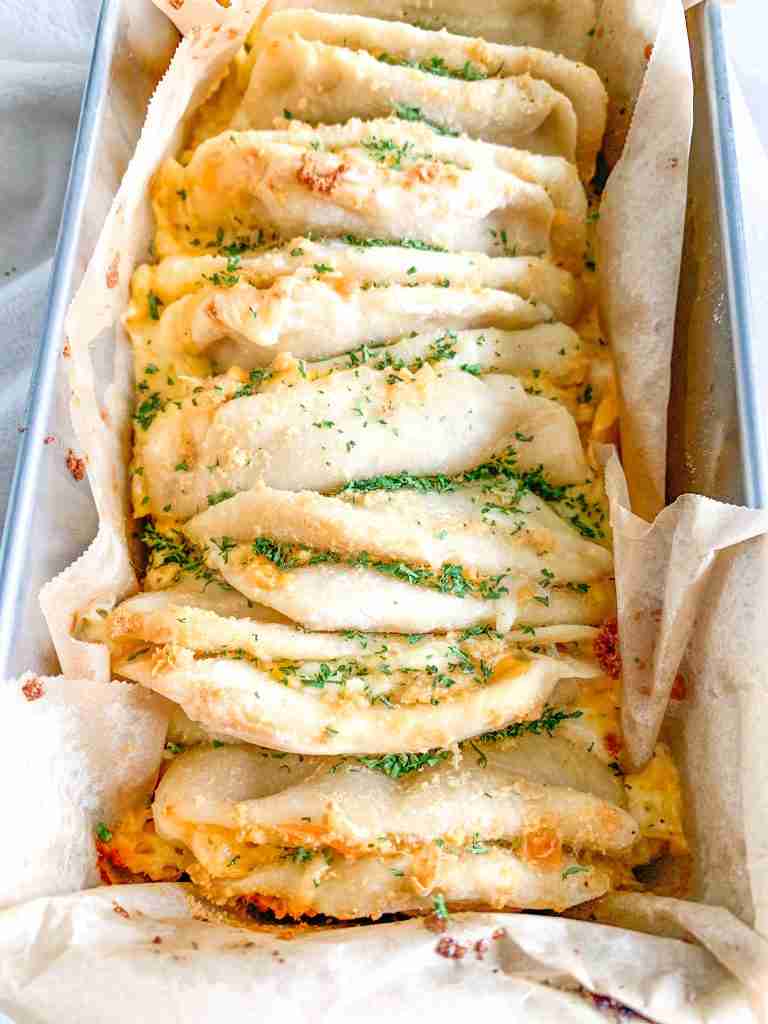
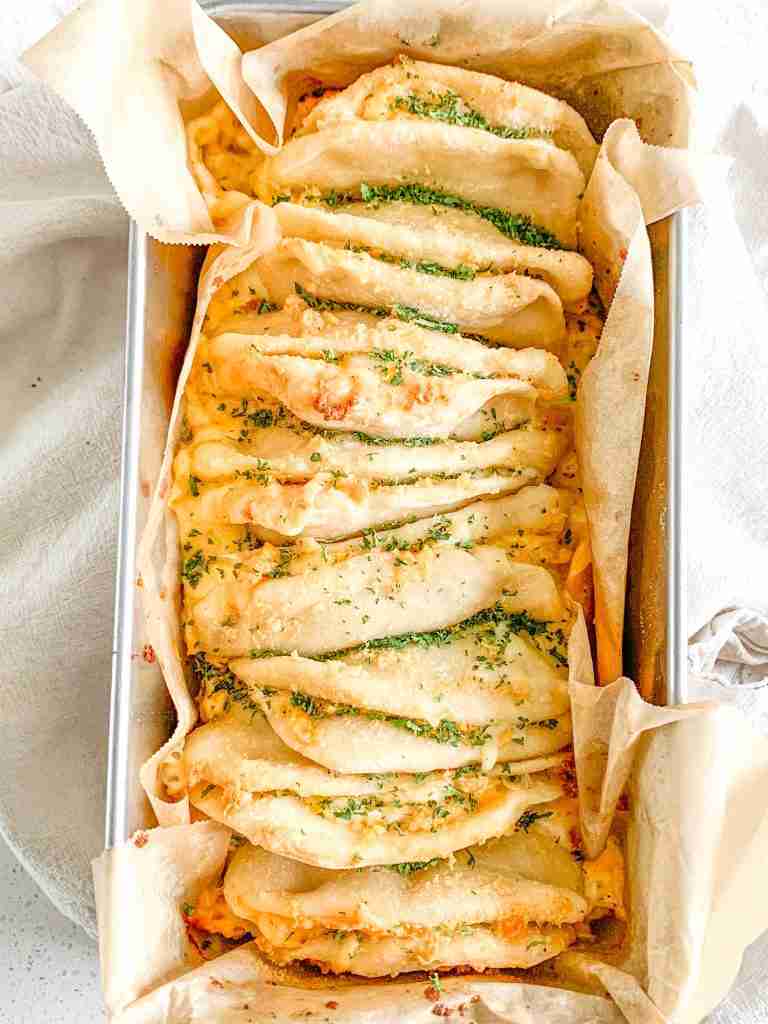
Once bulk ferment is complete and your dough has doubled or in size, line a 9×13″ stainless steel loaf pan with parchment paper. Set aside.
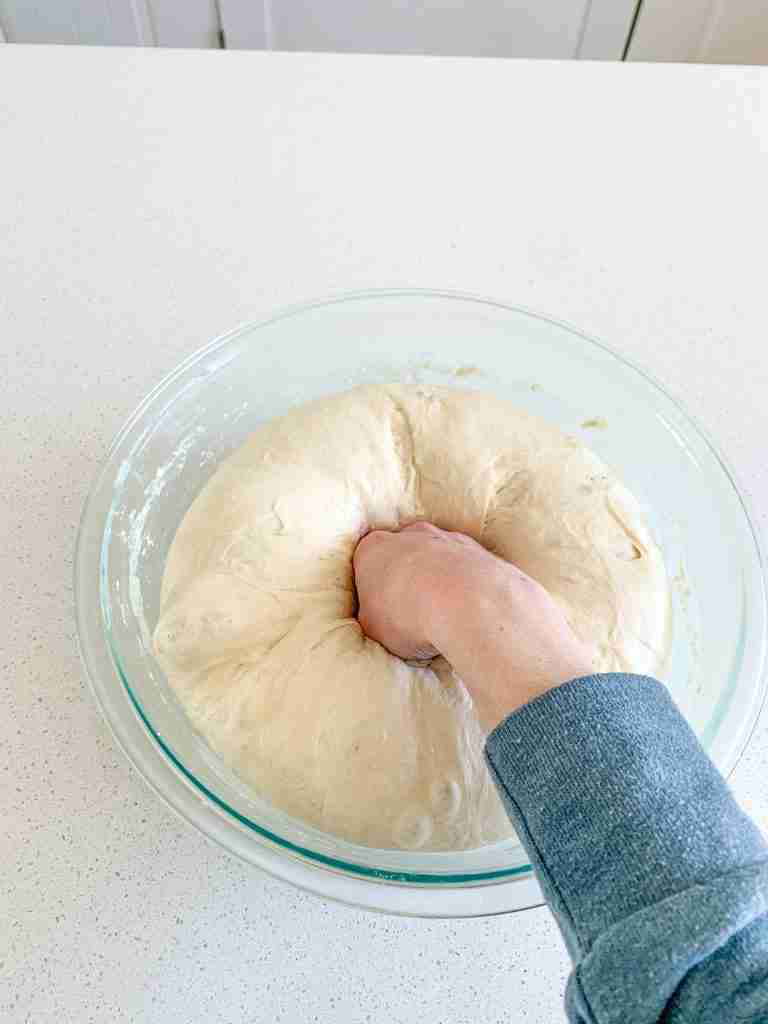
Punch down dough to deflate air bubbles, then turn out onto a lightly floured counter to prevent sticking.
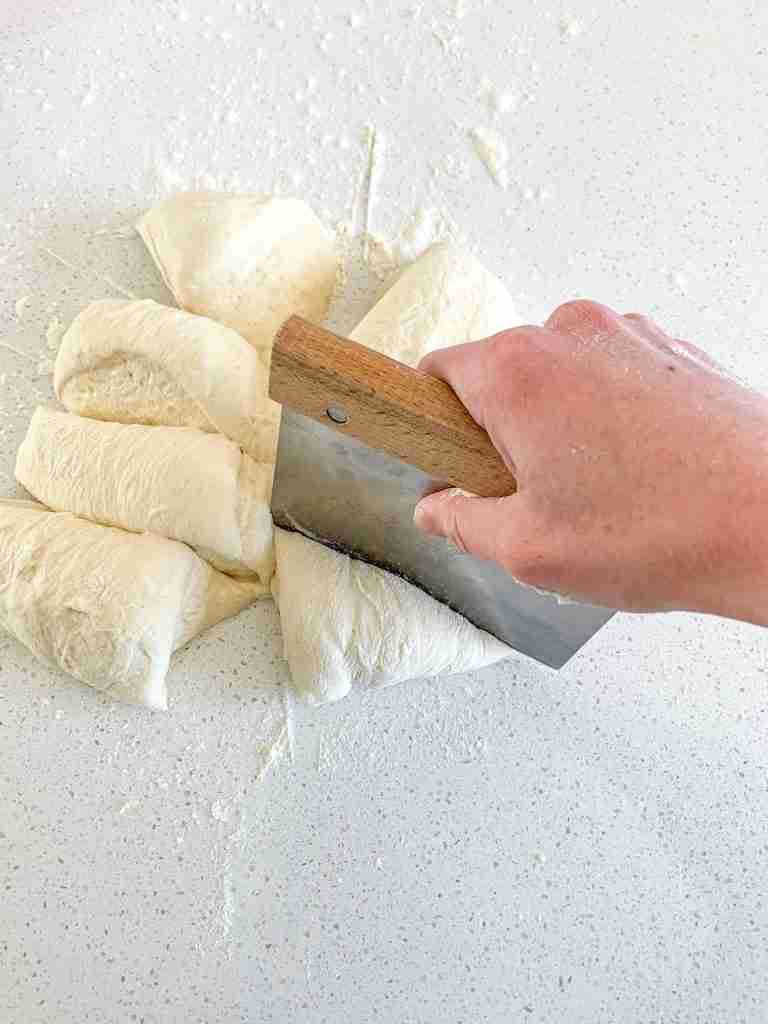
Divide dough into 8 equal pieces.
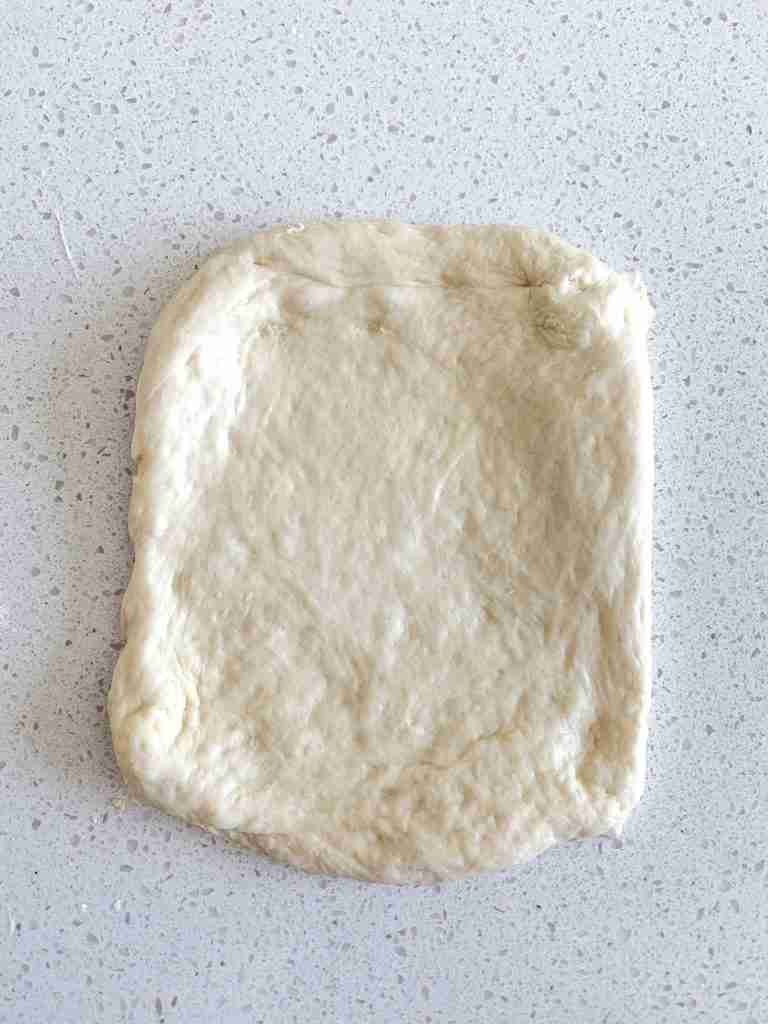
Roll each piece out into 1/4″ thick rectangles (they’ll be about 3×4″ each). Set aside.
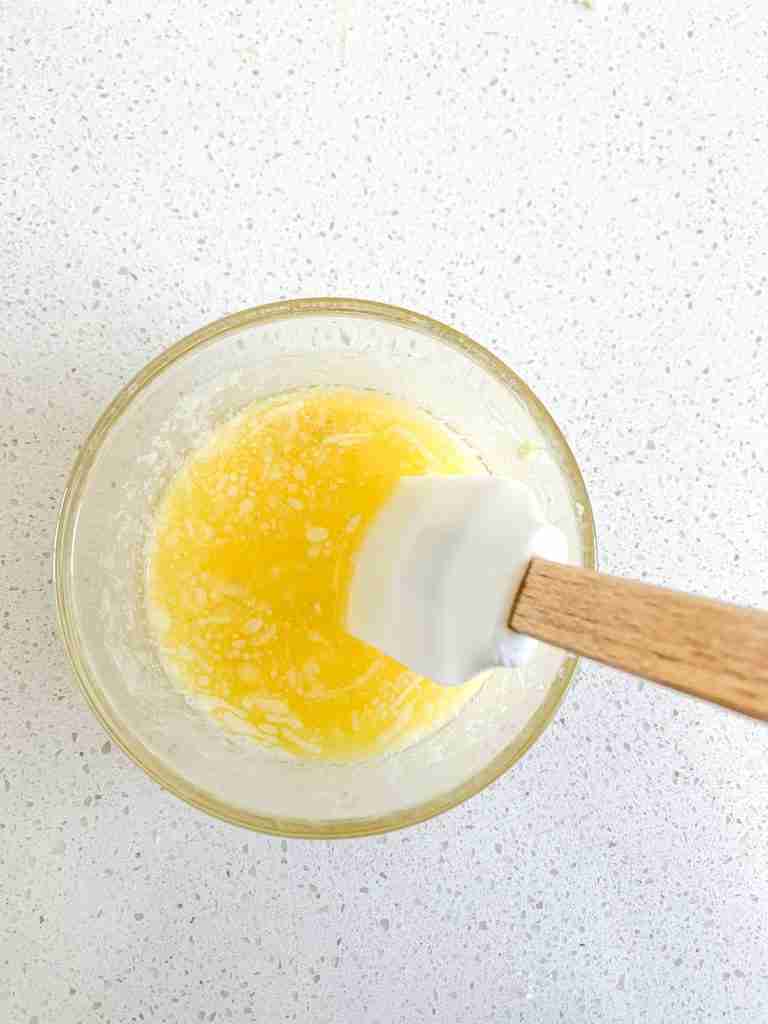
Once all the dough is rolled out, make garlic butter by combining melted butter, garlic powder, and salt in a small mixing bowl.
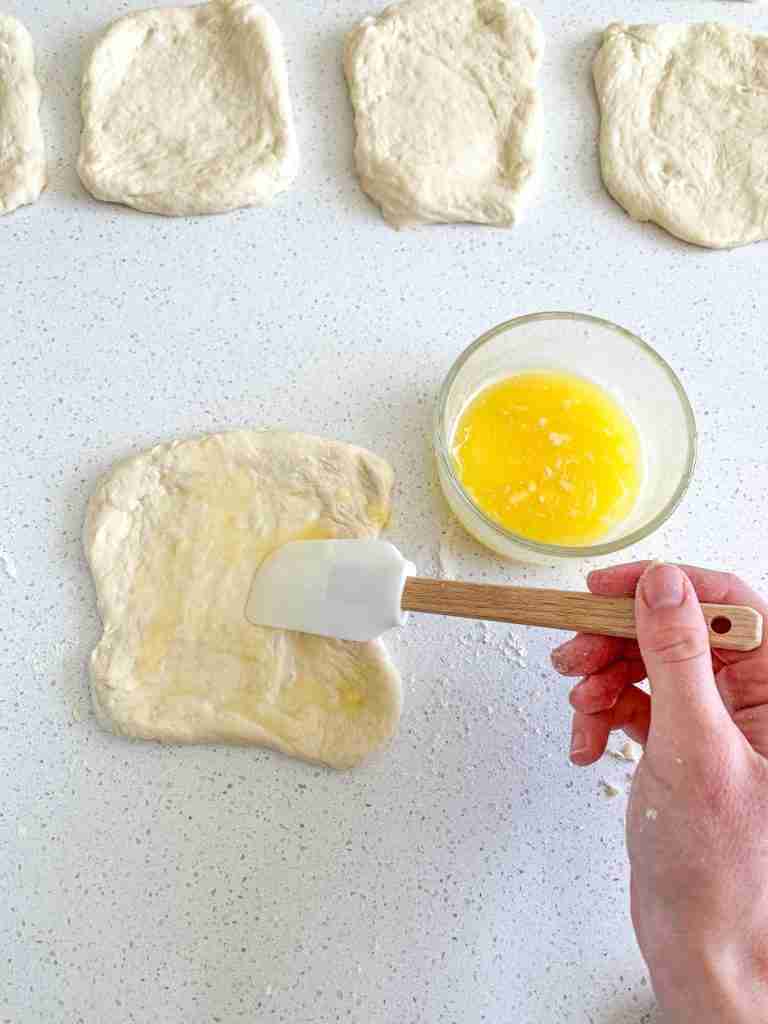
Brush garlic butter mixture with a kitchen brush on each rectangle of dough. Save any extra for brushing on top before baking.

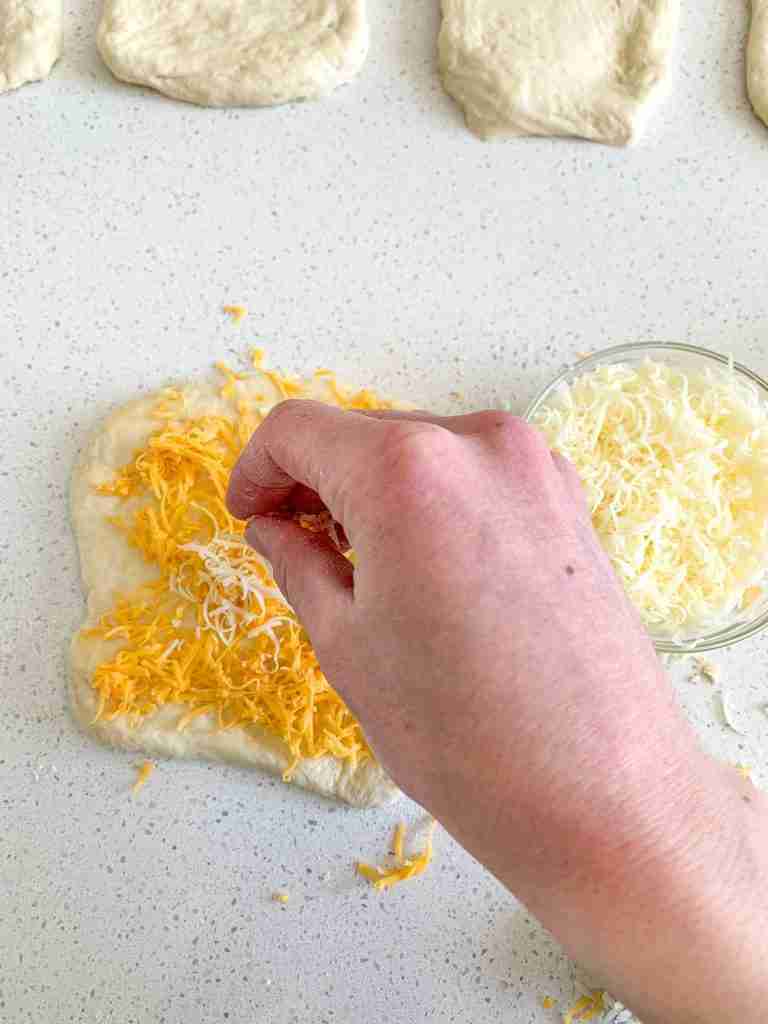
Then add a pinch of both shredded cheddar cheese and mozzarella cheese (about 1 Tbsp each) to all dough pieces. Evenly distribute any extra cheese.
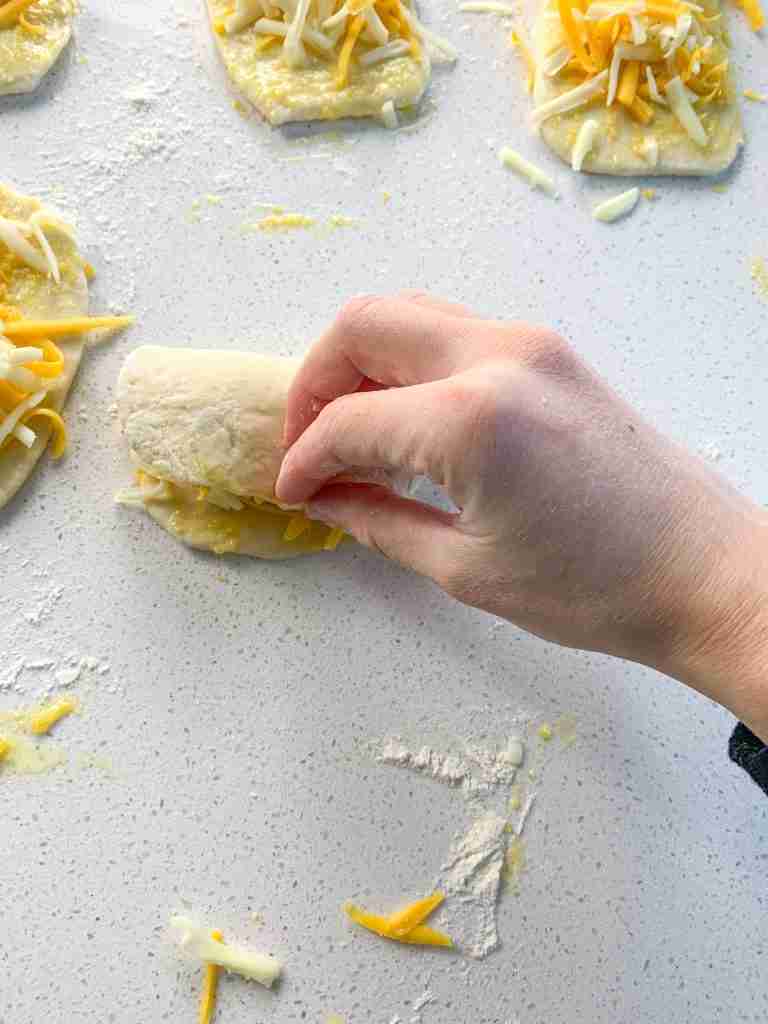
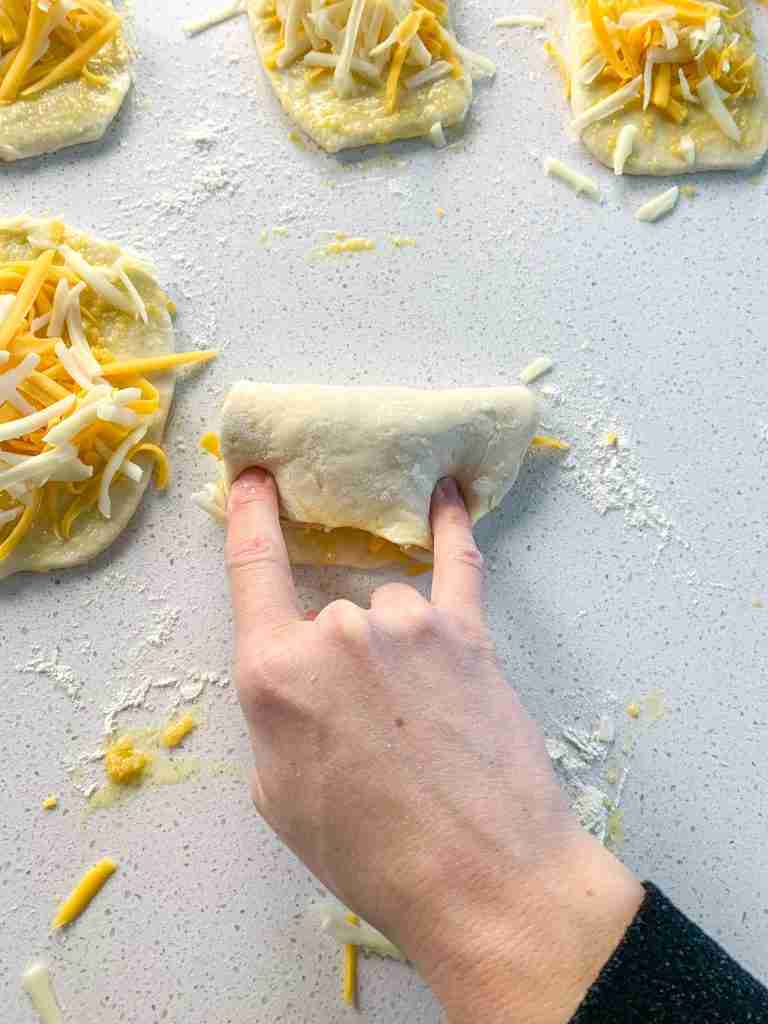
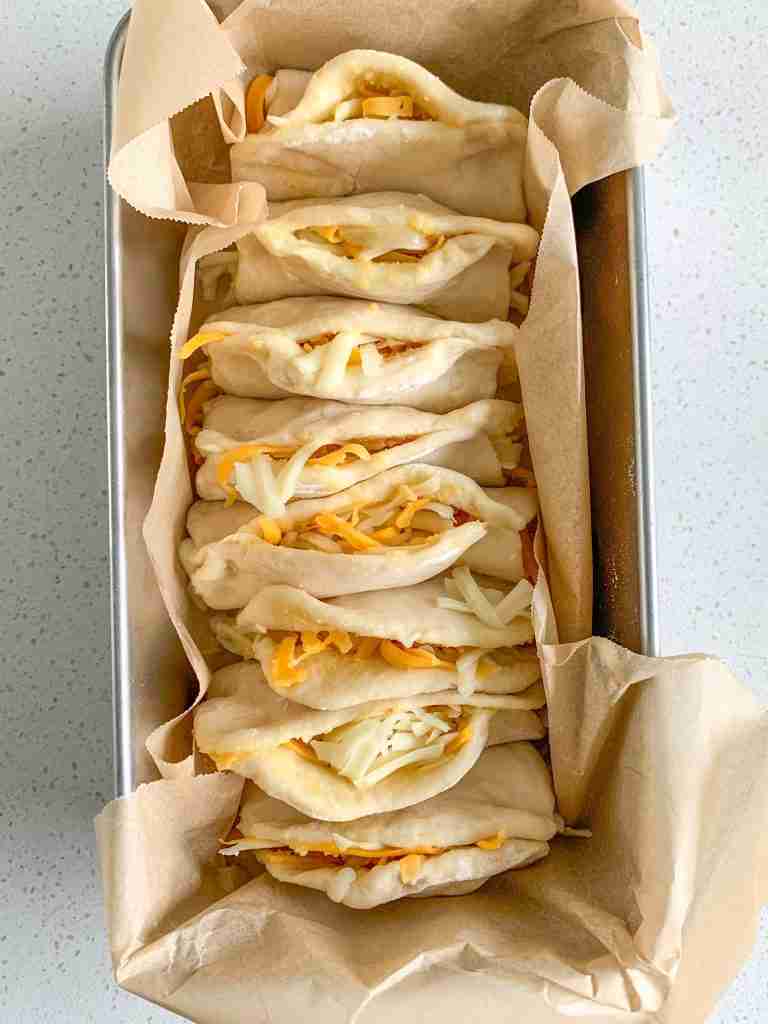
Fold each piece of dough in half so the garlic butter filling is in the middle. Pinch top two edges to seal but don’t close the entire top or side seams. Place each into the prepared pan with the opening facing up. Repeat until loaf pan is filled with folded dough (gentle squeeze in the last one if there isn’t much room).
2nd Rise/Proofing
Optional: Cover with a damp kitchen towel or Saran wrap and place pan in the fridge for up to 24 hours before baking to give yourself more time. (If you do this add 2-3 hours extra on to the 2nd rise/proofing time below since the dough starts out cold.)
To continue whether you did the cold ferment or not: Place a dry kitchen towel over pan of dough and let rise at room temperature on the countertop for 2-4 hours until puffy (they won’t grow in size as much as regular bread).
Bake & Serve Sourdough Cheese Bread
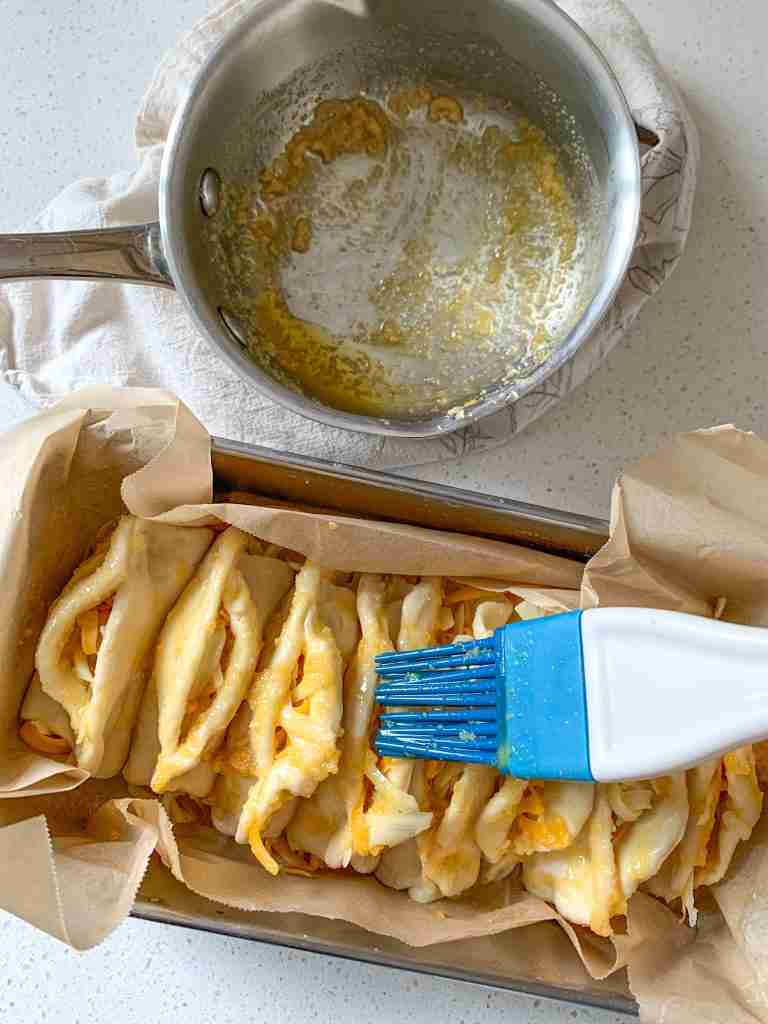
Preheat oven to 375 degrees and brush excess garlic butter on top of dough (if you have any left).
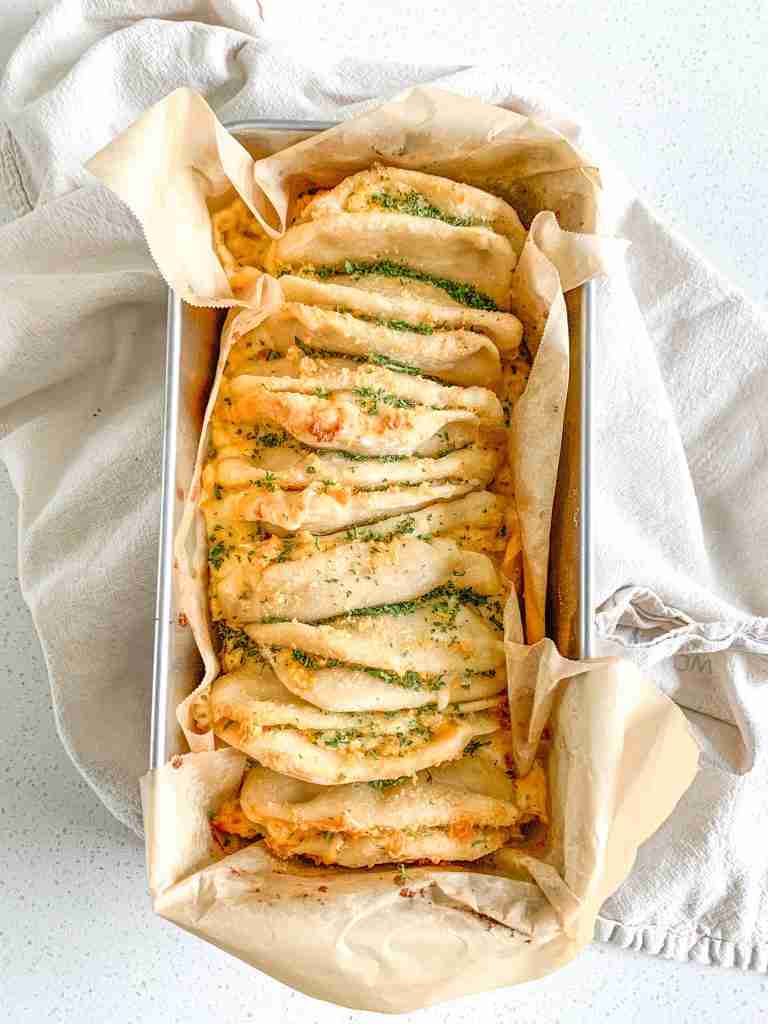
Bake in the preheated oven for 45 minutes or until fully cooked.
As soon as it comes out of the oven, sprinkle with dried parsley to give it color!
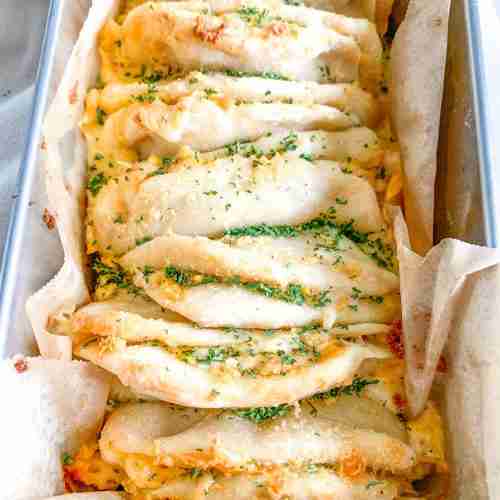
When ready to serve either keep in the pan or remove bread by the parchment paper and pull slices apart. Enjoy!
Video Tutorial

Our Favorite Ways to Serve Sourdough Pull Apart Bread
You can serve this sourdough garlic bread for many occasions: for a weeknight supper, holidays, potlucks, even for watching football. We love this bread as a side dish alongside many foods but especially soup! Here are a few of our favorite main dishes to serve with this bread:
- Savory Pumpkin Chicken Soup
- Grilled Chicken Bites with Creamy Garlic Sauce
- Better Than Olive Garden Alfredo Sauce
- Creamy Chicken Gnocchi Soup Recipe (better than Olive Garden)
- Creamy Cajun Chicken Soup
- Creamy Vegetable Chowder
- Easy Million Dollar Spaghetti
- Crockpot Chicken Enchilada Soup
Storing Instructions
Store this bread in an airtight container in the fridge for 5-6 days. Because of the cheese, it’s best not to store it at room temperature.
Freezing and Thawing Instructions
Once the bread has completely cooled, store in a freezer-safe baggie or container. It will last 3-6 months in the freezer. When ready to enjoy, place in the fridge overnight or warm straight from frozen on a sheet pan at 400 degrees Fahrenheit until warm.
My Favorite Way to Reheat
The best way to reheat this bread is on a sheet pan in the oven at 400 degrees Fahrenheit until warm. This keeps the flavor and texture of the bread while reheating. It’ll taste just like you first made it!

Frequently Asked Questions
Sourdough discard is unfed starter. I don’t recommend using it for this recipe as we’re wanting to get a rise on the bread and to do this we need a fed, active starter.
Make sure you bake it for the full 45 minutes. The outside should be golden brown. You can also use a kitchen meat thermometer to test the center of the loaf. It will be fully baked when it reads 190-200 degrees Fahrenheit.
You can leave the cheese out if you desire. This will make a great garlic pull apart bread.
Sure! You’ll want to use 4 garlic cloves. Do note that fresh garlic can oxidize (not harmful, just reacts with air during the ferment) and turn a blue – green color.
More Sourdough Bread Recipes You’ll Love
If you’re looking for more delicious sourdough bread recipes, try a few of these:
- Sourdough Apple Bread
- Artisan Sourdough Loaf for Beginners
- Sourdough Pesto Garlic Bread
- Sourdough Cinnamon Raisin Bread
- Sourdough Challah
- Sourdough Chocolate Babka
If you made this recipe, give it a 5-star rating below and share a photo on your social media stories! Be sure to tag @plumbranchhome
Recipe
Cheesy Sourdough Garlic Pull Apart Bread
Ingredients
Bread
- 1/4 cup fed sourdough starter
- 1/2 cup water
- 1 tsp salt
- 1 tsp garlic powder (no salt added)
- 1 1/2 cups all-purpose flour
Cheesy Garlic Filling
- 1 cup shredded low moisture mozzarella
- 1 cup shredded mild cheddar
- 2 tsp garlic powder
- 1 tsp sea salt
- 3 Tbsp melted salted butter
- optional – dried parsley
Instructions
Feed Your Starter
- BEFORE YOU GET STARTED: Feed your starter 4-12 hours before starting this recipe. I recommend feeding your entire starter jar a 2:1 ratio of unbleached flour to filtered water to get the same results as I do when making this recipe.(Example: Feed entire starter 1 cup flour + 1/2 cup water and let it sit on the counter at room temperature until it's bubbly and has grow in the jar. Your starter needs to be active, bubbly, and a thicker consistency to use in this recipe.)
Make the Dough
- In a large mixing bowl, add in sourdough starter, water, salt, and garlic powder. Stir until combined.
- Add flour and stir until a shaggy dough forms. Use your hands to bring the dough into a ball. (If dough is too wet, your starter is more hydrated than mine. Just add a few tablespoons of extra flour. If dough is too dry, your starter is less hydrated than mine. Just add a few tablespoons of extra water.)
- Turn dough out on the counter and knead by hand for 2 minutes or use an electric mixer with a dough hook. Place dough back into mixing bowl and cover with a lid loosely, plastic wrap, or a damp kitchen towel (that's been wet and rung out)
Bulk Ferment
- Let dough sit on the counter top at room temperature for 12 hours. Please see notes below!
Shape the Loaf
- Once bulk ferment is complete and your dough has doubled or in size, line a 9×13" stainless steel loaf pan with parchment paper. Set aside.
- Punch down dough to deflate air bubbles, then turn out onto a lightly floured counter to prevent sticking.
- Divide dough into 8 equal pieces
- Roll each piece out into 1/4" thick rectangles (they'll be about 3×4" each). Set aside.
- Once all the dough is rolled out, make garlic butter by combining melted butter, garlic powder, and salt in a small mixing bowl.
- Brush garlic butter mixture with a kitchen brush on each rectangle of dough. Save any extra for brushing on top before baking.
- Then add a pinch of both shredded cheddar cheese and mozzarella cheese (about 1 Tbsp each) to all dough pieces. Evenly distribute any extra cheese.
- Fold each piece of dough in half so the garlic butter filling is in the middle. Pinch top two edges to seal but don't close the entire top or side seams. Place each into the prepared pan with the opening facing up. Repeat until loaf pan is filled with folded dough (gentle squeeze in the last one if there isn't much room).
2nd Rise/Proofing
- Optional: Cover with a damp kitchen towel or Saran wrap and place pan in the fridge for up to 24 hours before baking to give yourself more time. (If you do this add 2-3 hours extra on to the 2nd rise/proofing time below since the dough starts out cold.)
- To continue whether you did the cold ferment or not: Place a dry kitchen towel over pan of dough and let rise at room temperature on the countertop for 2-4 hours until puffy (they won't grow in size as much as regular bread).
Bake & Serve
- Preheat oven to 375 degrees and brush excess garlic butter on top of dough (if you have any left).
- Bake in the preheated oven for 45 minutes or until fully cooked.
- As soon as it comes out of the oven, sprinkle with dried parsley to give it color!
- When ready to serve either keep in the pan or remove bread by the parchment paper and pull slices apart. Enjoy!
Video
Notes
- If your dough doesn’t look like it’s doing anything halfway through the rises, you need to place it in a slightly warmer area.
- This can be in a turned-off oven with the light on and oven door open, or you can slightly warm the oven to about 75-80 degrees Fahrenheit, then turn it off and place your dough inside with the door shut.
- Never leave the oven on, even on the keep warm setting, with fermenting dough inside. Your dough, for both rises, needs to double.
- If your dough doesn’t double even in the warmer area, there is a problem with your starter. It is too weak to ferment the dough even in a warm environment.
- To fix this, you will want to leave your starter out on the counter for 2 days and feed it every 12 hours at a 2:1 ratio of unbleached flour to filtered water.
- For example, 1 cup unbleached flour + 1/2 cup filtered (or bottled) water.
- Make sure you’re using unbleached flour and filtered or bottled water to do this. If you don’t, it will affect your starter strength. Reverse osmosis water (or any water that uses salt in the filter) can make the starter weak.
- This will strengthen the cultures in your starter to give you fluffy baked bread and treats. After the 2 days, you can go back to feeding it like usual (once a week if stored in the fridge or once a day if stored on the counter). Be sure to use the 2:1 ratio feeding from here on out.