Sourdough Honey Buns (Inspired By Little Debbie)
When you take a bite of my sourdough honey buns, you get a mouth full of pillowy soft sourdough, sweet honey, and a hint of cinnamon. You won’t regret whipping up this simple recipe. It really is easy! It’s inspired by the Little Debbie baked treats you can buy at the store. I wanted to make my own version at home, from scratch, that not only tastes better but is much better for you!
This recipe was inspired by the treats made by Little Debbie. But my recipe is not affiliated with or endorsed by the brand and/or corporation. This post may contain affiliate links of items I know and love. Read our disclosure policy for more information. I NEVER use AI (artificial intelligence) to create content for Plum Branch Home. Recipes, blog posts, photos, videos, podcasts, social media content: everything is made from scratch by me, Molly LaFontaine. After developing my recipes, they’re tested 2x by my husband, Tyler, and I before publishing. What you see from Plum Branch Home is real. It’s made for a reason, tested, and loved!
Sourdough Honey Buns are Better Than Little Debbie’s
When I say these sourdough honey buns are better than Little Debbie’s, I mean it! When I was a kid, I loved Little Debbie’s honey buns.
I have fond memories of selling those little bagged baked treats on a plastic picnic table during our summer garage sales. Boy was that a fun business setup! I loved providing refreshments to our shoppers, haha!
These honey buns are not only cheaper to make than buying the boxes of Little Debbie’s, but they’re also much more wholesome!
Why Make Them Instead of Buying Them
- Cheaper: When you make honey buns at home, you’re saving money. This recipe will cost a fraction of what the Little Debbie’s cost.
- Better for you: These honey buns are so much better for you than the kind you buy at the store! These buns are made of wholesome ingredients like raw honey and sourdough.
- Tastes 100 times better: The taste of these buns will blow you away. You’re not getting any weird flavors or a sugar coating on the roof of your mouth. You can tell they’re made with love!
Important Things You Need To Know
This recipe doesn’t include stretch and folds due to the kneading for 3 minutes after the dough bulk ferments. This is an uncommon way of doing honey buns but it works very well for this recipe.
Starter Disclaimer: If your dough is sticky and hard to handle, your starter is more hydrated than the 50% hydration I recommend. Be sure to feed it a 2:1 ratio of flour to water 4-12 hours before making this recipe to ensure the starter is thick and not runny. It needs to be active and bubbly.
If you choose to feed your starter a different way before baking please note that there may be differences in your dough and the finished product.
Ingredients You’ll Need
Buns
- fed sourdough starter (fed 4-12 hours before using)
- cold stick butter (salted)
- all-purpose flour
- water
- salt
- raw honey
- baking powder
- baking soda
- milk (for brushing tops before baking)
Filling
- butter (melted)
- ground Cinnamon
- raw honey
Glaze
- raw honey
- butter (melted)
- milk
- pure vanilla extract
My Tips for Success
- Make sure you follow my recipe closely and don’t skip any steps.
- Give the dough a good bulk fermentation for 10–12 hours. It needs to double or even triple in size.
- If your dough isn’t doubling in size during the ferment, place the bowl in the oven (make sure it’s turned off) with the oven light on. Crack the door so it doesn’t get too hot. This will help warm the dough without making it too hot.
- Use cold salted stick butter for this recipe.
Step-By-Step Instructions
Make the Dough
Add sourdough starter, butter grated with a cheese grater, flour, water, salt, and honey to a large bowl and mix to combine.
To get the excess flour on the bottom, knead the dough in the bowl with your hands until it’s all incorporated and a sticky dough forms.
Cover bowl with a lid or kitchen towel and let bulk ferment on the counter at room temperature for 10-12 hours (dough needs to double in size).
Shape the Buns
After bulk ferment, uncover dough and sprinkle baking soda and baking powder over dough.
Knead in the baking soda and baking powder by hand (or electric mixer) for 3 minutes.
Make the filling by stirring melted butter, cinnamon, and honey in a bowl until combined. Set aside.
Roll out dough on a lightly floured surface into a rectangle approximately 10″ x 20″.
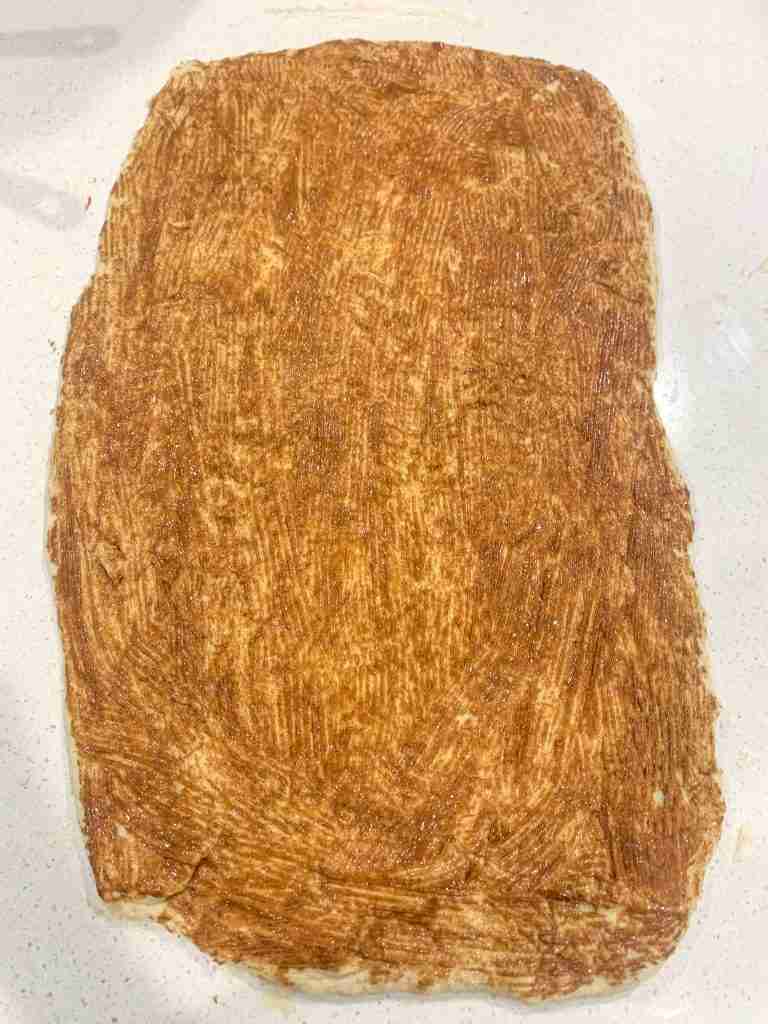
With a kitchen basting brush or butter knife, evenly spread the filling into a light layer over the entire rectangle of dough (it will be a very light layer of filling, that’s what you want)
Starting at the shorter 10″ side (shorter side) of the rectangle begin to roll the dough into a log. Pinch the seam together with your hands and slice the log into 10, 1.5 to 2-inch buns.
Place buns on a baking sheet (lined with parchment or lightly greased with butter and flour) so that they’re in a cluster just barely touching one another.
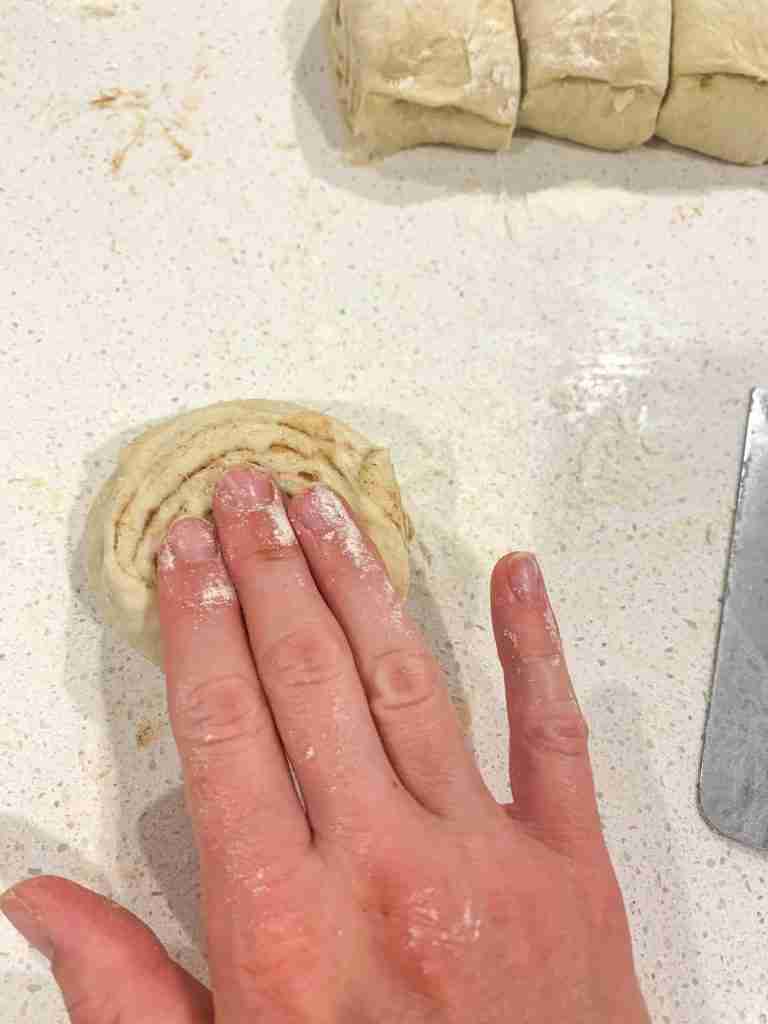
Use your hand to gently push down on each one to help flatten them a bit.
Prep the Buns & Bake
Cover the baking sheet with a kitchen towel, plastic wrap, or a second sheet pan, and let the buns rise for 2 hours.
After the rise, you can either continue the recipe or cover the baking sheet and pop the buns in the fridge until the morning to bake.
When you’re ready to continue the recipe, preheat oven to 375 degrees Fahrenheit.
Brush the tops of the buns with 1/3 cup milk or cream and bake for 20-25 minutes. (Test to ensure they’re baked fully by using a toothpick in the center bun. If it comes out clean, they’re done. If there’s dough residue, they need a few extra minutes).
During this time of baking make the glaze by adding honey, melted butter, milk, and vanilla in a bowl, stirring until evenly combined.
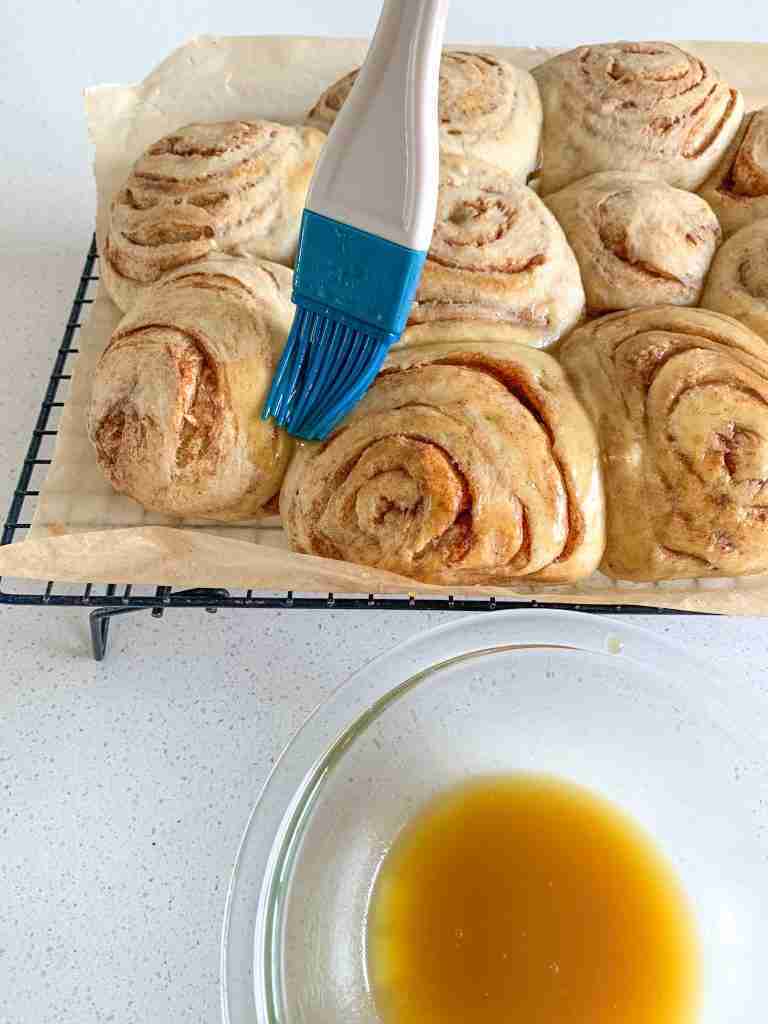
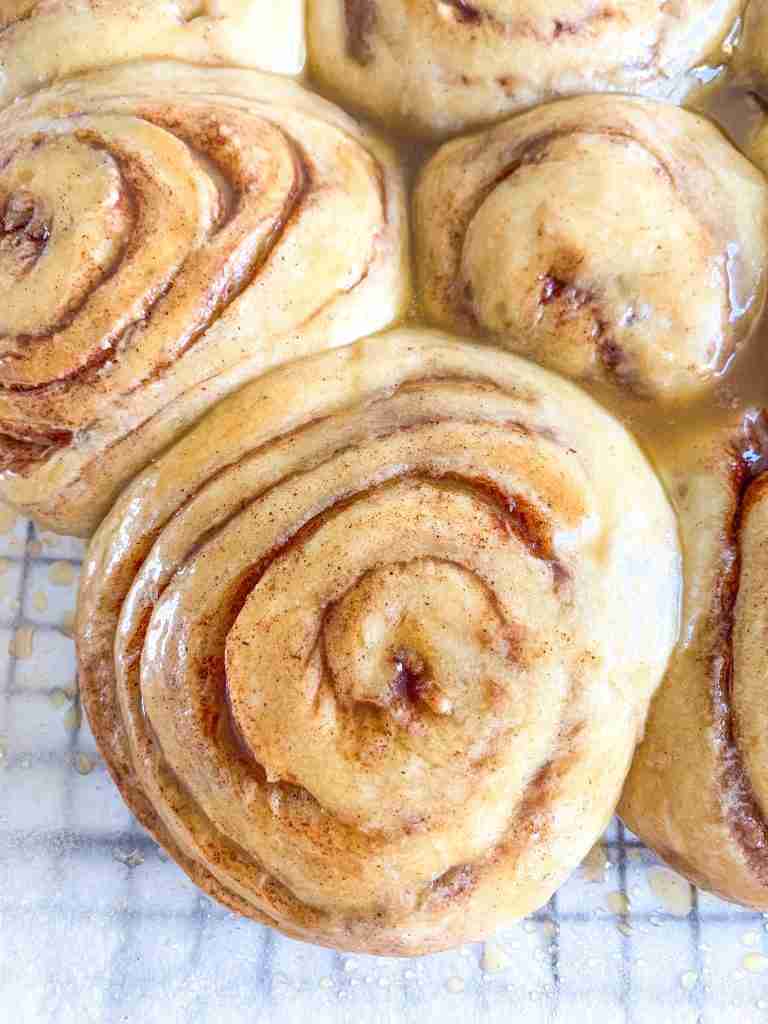
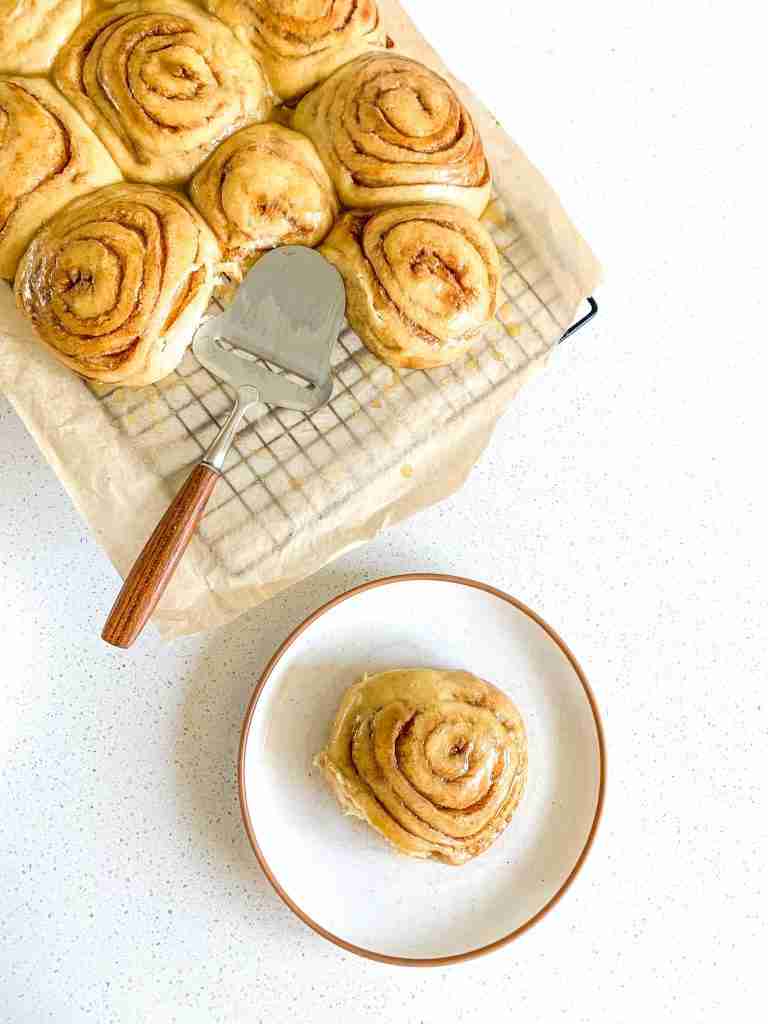
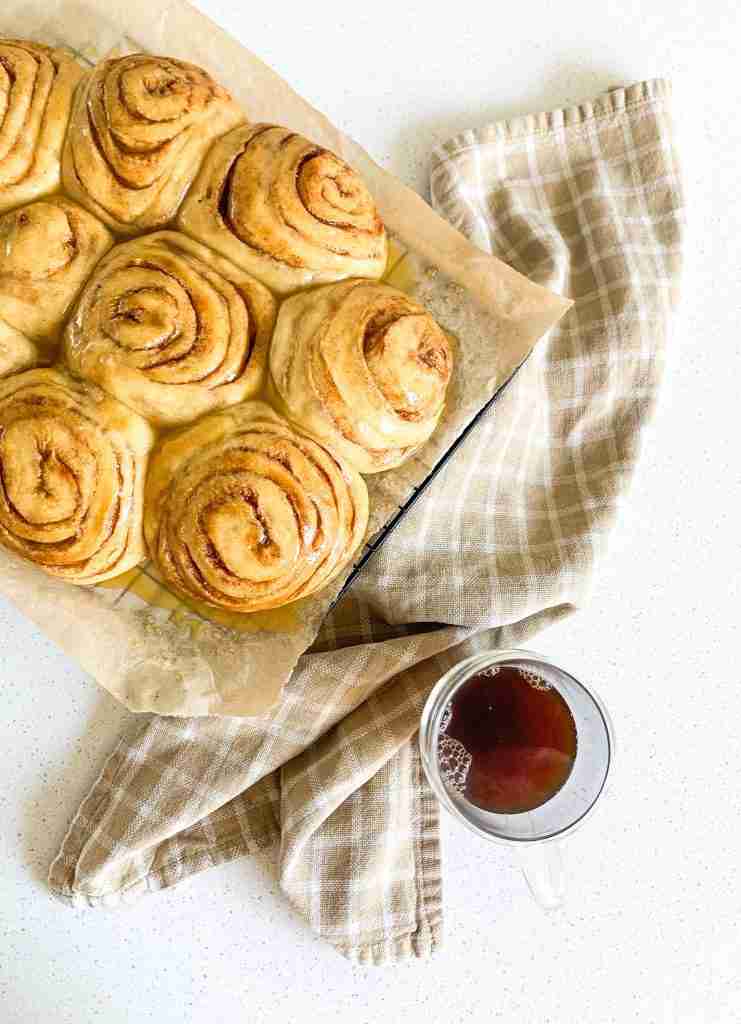
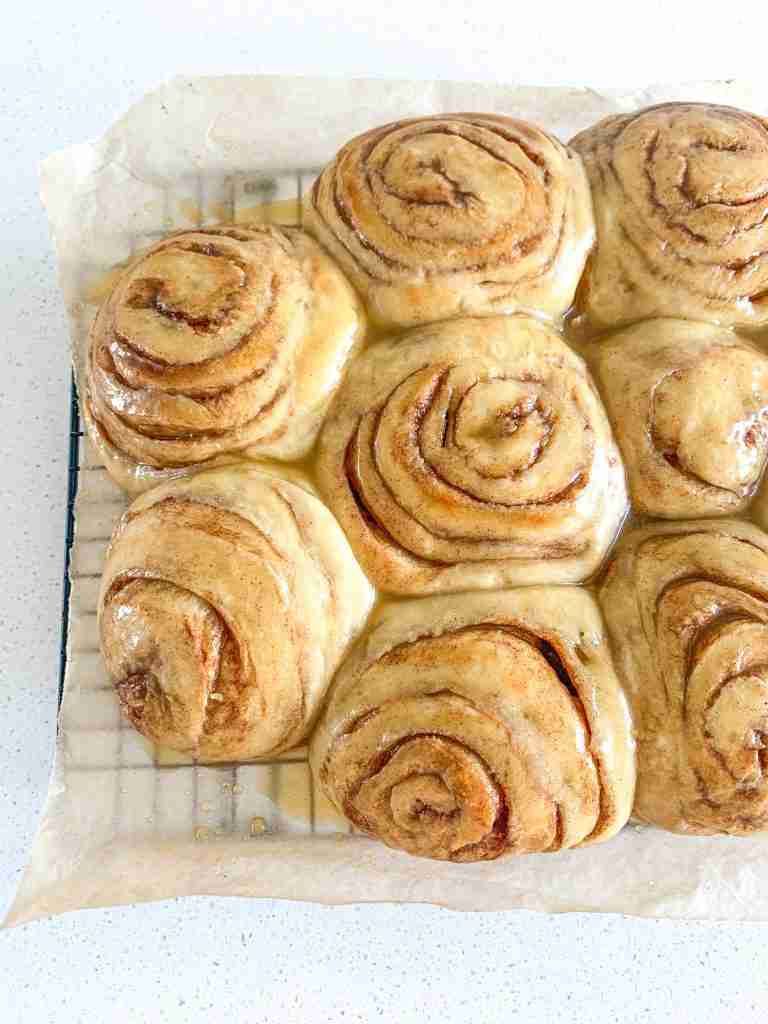
When the buns are done baking, immediately brush the glaze over them until it is all used up. Enjoy!
Storing Leftovers
Store leftover honey buns in an airtight container once they’re fully cooled down. You can keep them at room temperature for 2-3 days. After that, they need to be moved to the fridge and eaten within a few days.
Reheat Honey Buns
To reheat leftover honey buns, place them in the oven or toaster oven at 325 degrees for 5-10 minutes until warm. They are fantastic at room temperature, too!
FAQs
For this recipe, you will need to use honey for the recipe to come out like it’s meant to. You can find raw unfiltered honey in most grocery stores.
For this recipe use salted stick butter.
You can simply insert a toothpick or knife into the center of the middle bun. If it comes out clean they’re fully baked. If it comes out with a residue of dough, they need a few more minutes.
More Sourdough Recipes You’ll Love
- Sourdough Cinnamon Rolls Recipe
- Strawberry Sourdough Sweet Rolls
- Sourdough Apple Bread
- Sourdough Pumpkin Bread
If you try this recipe and love it, I would love it if you could come back and give it 5 stars! Share a photo of what you made and tag me on Facebook or Instagram @plumbranchhome
Recipe
Sourdough Honey Buns (Inspired by Little Debbie)
Ingredients
Buns
- 1/2 cup fed sourdough starter (needs to be fed 4-12 hours before using)
- 8 Tbsp cold stick butter (salted)
- 3 cups all-purpose flour
- 1 cup water
- 1 tsp salt
- 2 Tbsp raw honey
- 1 tsp baking powder
- 1/2 tsp baking soda
- 1/3 cup milk (FOR BRUSHING TOPS, DON'T ADD TO DOUGH)
Filling
- 4 Tbsp butter (melted)
- 1 Tbsp ground Cinnamon
- 2 Tbsp raw honey
Glaze
- 3 Tbsp raw honey
- 2 Tbsp butter (melted)
- 1 Tbsp milk
- 1/2 tsp pure vanilla extract
Instructions
Before You Begin Prepare Your Starter
- Feed your starter 4-12 hours before starting this recipe. I recommend feeding it a 2:1 ratio of unbleached flour to filtered water to get the same results as I do when you make this recipe. Your starter needs to be active, bubbly, and a thicker consistency before you begin this recipe.
Make the Dough
- Add fed sourdough starter, butter grated with a cheese grater, flour, water, salt, and honey to a large bowl and mix to combine. (IMPORTANT: Do NOT add milk to dough, it is for brushing the tops before baking)
- To get the excess flour on the bottom, knead the dough in the bowl with your hands until it’s all incorporated and a sticky dough forms.
- Cover bowl with a lid or kitchen towel and let bulk ferment on the counter at room temperature for 10-12 hours (dough needs to double in size).
Shape the Buns
- After bulk ferment, uncover dough and sprinkle baking soda and baking powder over dough.
- Knead in the baking soda and baking powder by hand (or electric mixer) for 3 minutes.
- Make the filling by stirring melted butter, cinnamon, and honey in a bowl until combined. Set aside.
- Roll out dough on a lightly floured surface into a rectangle approximately 10″ x 20″.
- With a kitchen basting brush or butter knife, evenly spread the filling into a light layer over the entire rectangle of dough (it will be a very light layer of filling, that’s what you want)
- Starting at the shorter 10″ side (shorter side) of the rectangle begin to roll the dough into a log. Pinch the seam together with your hands and slice the log into 10, 1.5 to 2-inch buns.
- Place buns on a baking sheet (lined with parchment or lightly greased with butter and flour) so that they’re in a cluster just barely touching one another.
- Use your hand to gently push down on each one to help flatten them a bit.
Prep the Buns & Bake
- Cover the baking sheet with a kitchen towel, plastic wrap, or a second sheet pan, and let the buns rise for 2 hours.
- After the rise, you can either continue the recipe or cover the baking sheet and pop the buns in the fridge until the morning to bake.
- When you’re ready to continue the recipe, preheat oven to 375 degrees Fahrenheit.
- Brush the tops of the buns with 1/3 cup milk or cream and bake for 20-25 minutes. (Test to ensure they’re baked fully by using a toothpick in the center bun. If it comes out clean, they’re done. If there’s dough residue, they need a few extra minutes).
- During this time of baking make the glaze by adding honey, melted butter, milk, and vanilla in a bowl, stirring until evenly combined.
- When the buns are done baking, immediately brush the glaze over them until it is all used up. Enjoy!
Notes
- Make sure your starter is active! BEFORE YOU GET STARTED: Feed your starter 4-12 hours before starting this recipe. I recommend feeding it a 2:1 ratio of unbleached flour to filtered water to get the same results as I do when you make this recipe. Example: Feed 1 cup flour + 1/2 cup water and let the starter sit on the counter at room temperature until it’s bubbly and has grow in the jar. Your starter needs to be active, bubbly, and a thicker consistency to begin this recipe.
- Let the dough bulk ferment for 12 hours. It is important to let your dough bulk ferment for the full 12 hours. It should double in size and have air bubbles in it.
- Place the dough in a warm spot to rise. For both the bulk ferment and the second rise after shaping, your dough needs to be at room temperature in a non-drafty place.
- If your dough doesn’t look like it’s doing anything halfway through the rises, you need to place it in a slightly warmer area.
- This can be in a turned-off oven with the light on and oven door open, or you can slightly warm the oven to about 75-80 degrees Fahrenheit, then turn it off and place your dough inside with the door shut.
- Never leave the oven on, even on the keep warm setting, with fermenting dough inside. Your dough, for both rises, needs to double.
- If your dough doesn’t double even in the warmer area, there is a problem with your starter. It is too weak to ferment the dough even in a warm environment.
- To fix this, you will want to leave your starter out on the counter for 2 days and feed it every 12 hours at a 2:1 ratio of unbleached flour to filtered water.
- For example, 1 cup unbleached flour + 1/2 cup filtered (or bottled) water.
- Make sure you’re using unbleached flour and filtered or bottled water to do this. If you don’t, it will affect your starter strength. Reverse osmosis water (or any water that uses salt in the filter) can make the starter weak.
- This will strengthen the cultures in your starter to give you fluffy baked bread and treats. After the 2 days, you can go back to feeding it like usual (once a week if stored in the fridge or once a day if stored on the counter). Be sure to use the 2:1 ratio feeding from here on out.
These look so delicious!
Thank you so much!
Shut your mouth!! These sourdough honey buns look rediculous!! Totally whipping up a batch!🤩
Thank you so much!! They are soooo good! You’re going to love them!
Mmm these look and sound so good! Definitely keeping this in the back of my mind for a cozy baking day!
Thank you so much! You’re going to love them!
Oh my goodness! These look like heaven! I’m saving this recipe.
I’m so happy to hear that! You’re going to love them!
I’ve been looking for a cinnamon-like bun that has honey instead! Can’t wait to try it!
Woohoo! So excited you found my recipe! You’re going to love it!
Looks amazing! Love the long ferment AND the honey! Can’t wait to try it out
Thank you so much! They are so delicious!
Hi! These look delicious! I would love to have this recipe in grams so I know that I am doing the same measurements as you. Could you update the recipe?
Hi Amy! Thank you so much! I will keep this in mind for the future. For now I recommend using this cups to grams converter to help you: https://www.thecalculatorsite.com/cooking/grams-cups.php
I completely forgot to do the baking soda/powder this morning, but they still turned out great. thank you for the recipe
I’m so happy to hear that! Thank you for sharing!
Hello! So my mix is very watery as it is fermenting…..
Any ideas?
Thank you!
Hello! So this usually happens if your starter is a little runny (aka more hydrated). This is very common.
Since you’re already in the middle of the process, when you go to shape the buns, add more flour to help.
Then next time you make this recipe, be sure your starter is thick. Or if your starter is runny just add a little less liquid.
If you have any more questions, let me know!
I followed your recipe exactly and they came out absolutely flawless! My husband can’t get enough of them. Thank you for sharing
.
Thank you so much!! I’m so excited you and your husband love this recipe!
I had to put my dough in the refrigerator once it doubled , it if I put it on the counter for a few hours can I still continue with the recipe ?
Refrigerating after the dough doubles during the bulk ferment doesn’t cause any issues. Just continue the recipe like normal, you don’t need to leave it sit out before you shape the rolls.
Delicious easy recipe, so soft and tasty!
Thank you so much! So glad you enjoyed it!
I fed a portion of my starter this morning thinking I would mix up some potato buns this evening. I had some fed starter left over and found this recipe-WOW! So I mixed them up also. I cannot wait until tomorrow morning!! Retirement just keeps getting better!!
Yay! How exciting! You’re going to love these honey buns, enjoy!
Currently in BF stage in the counter. Hoping it doubles by 10 pm. Can I then put the bowl of dough in the fridge overnight? Then tomorrow shape the buns, and place them in the fridge after 2 hours for another night? I wanted to bake Saturday morning.
Yes you can! Then on Friday (today) get the dough out of the fridge and shape the dough. You can then place the shaped dough in the fridge until you’re ready to bake but you’ll need to do the 2nd rise right before baking. This ensures they are soft and fluffy. But if you don’t have time for the 2 hour rise in the morning before baking, I’ll let you in on a little secret. You can just pop the shaped buns from the fridge into the oven without the 2nd rise. They won’t be as fluffy but they’ll still be delicious! I do this sometimes if I don’t want to bake the night before.